
Basics
Top Header Bar:

The top header bar shows the logged in user from the top-right corner. When clicking on the logged in user you have the option to Change Password or Logout:

The menu button allows you to minimize and maximize the left-pane menu:

Left Pane Menu:
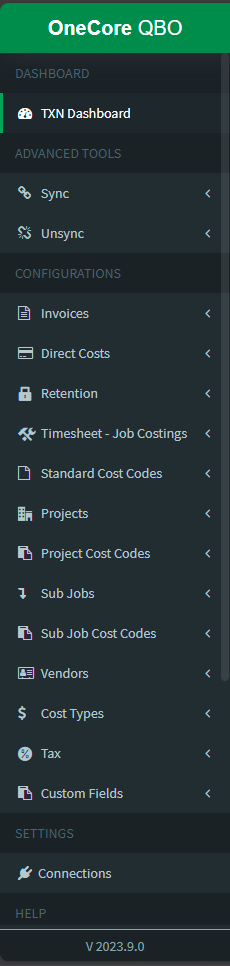
The left pane menu allows you to view and set up your company’s integration settings between Procore and QuickBooks Online. The menu options include:
- Transaction Dashboard
- Advanced Tools
- Sync: Direct Cost, Commitment Claim, Head Contract Claim, Claim Payment
- Unsync: Direct Cost, Commitment Claim, Head Contract Claim, Claim Payment
- Configurations
- Invoices
- Direct Costs
- Retention
- Timesheet – Job Costings
- Standard Cost Codes
- Projects
- Project Cost Codes
- Sub Jobs
- Sub Job Cost Codes
- Vendors
- Cost Types
- Tax
- Custom Fields
- Settings
- Connections
- Help
- KB Articles
- Contact Support
Transaction Dashboard:
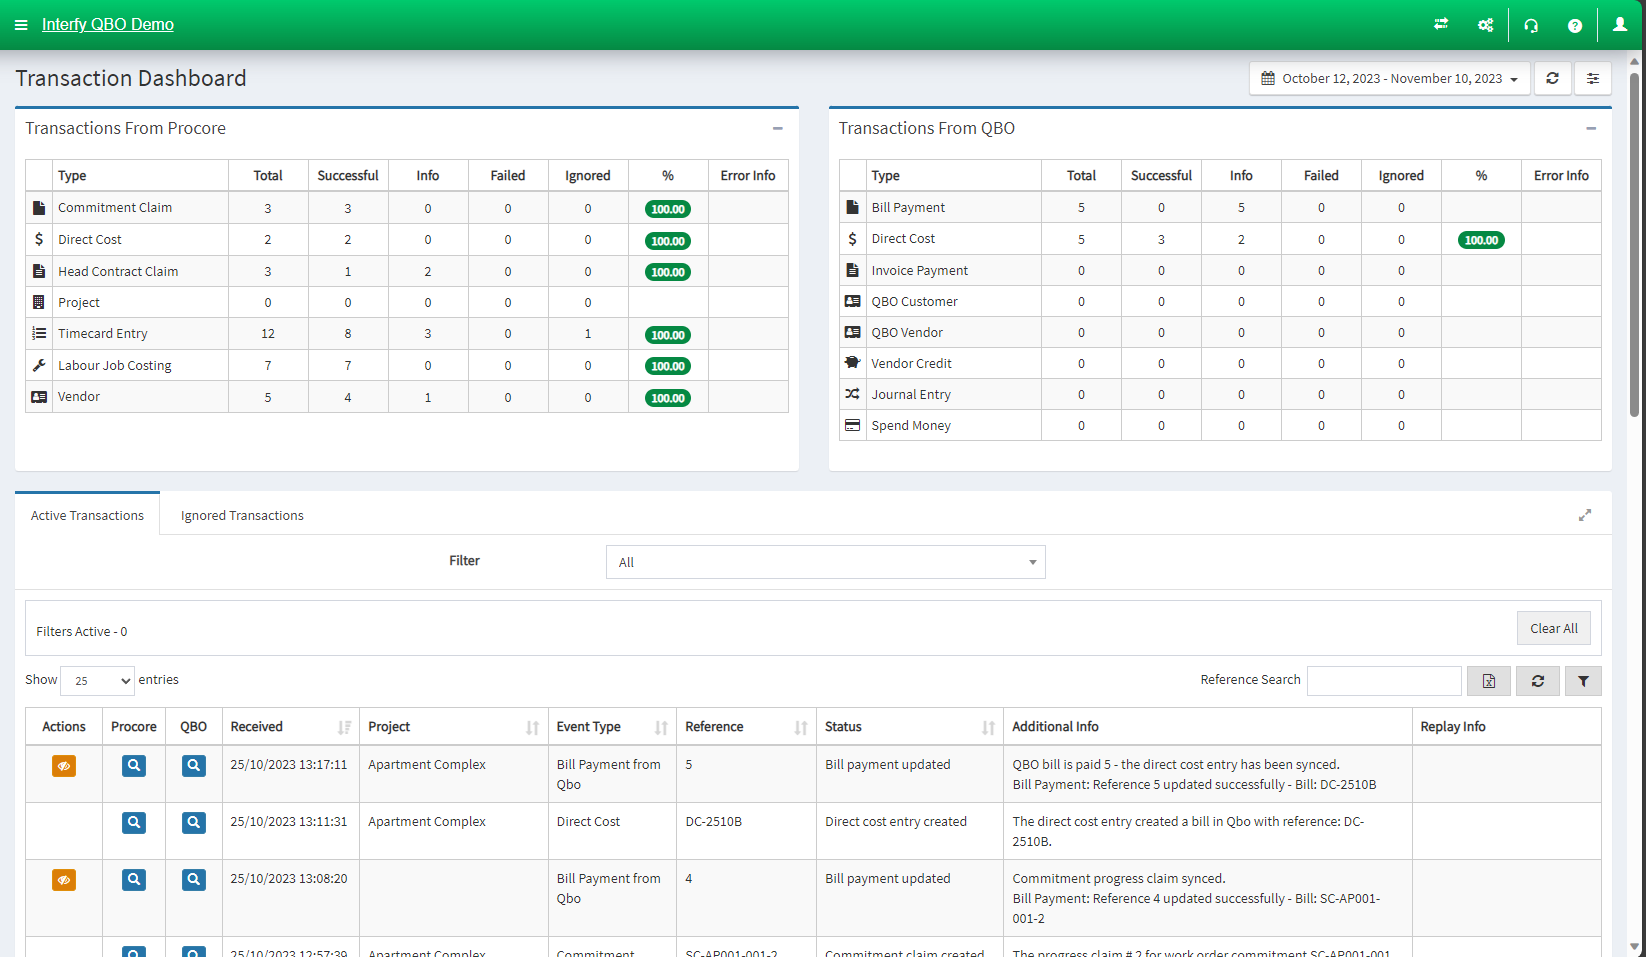
The dashboard allows you to view any mapping errors as well as failed transactions, if the transaction isn’t going through.
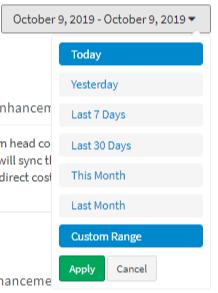
You can filter the overall transactions by the date range:
Invoices:
Invoices has two options: General Settings and Head Contract.
General Settings:
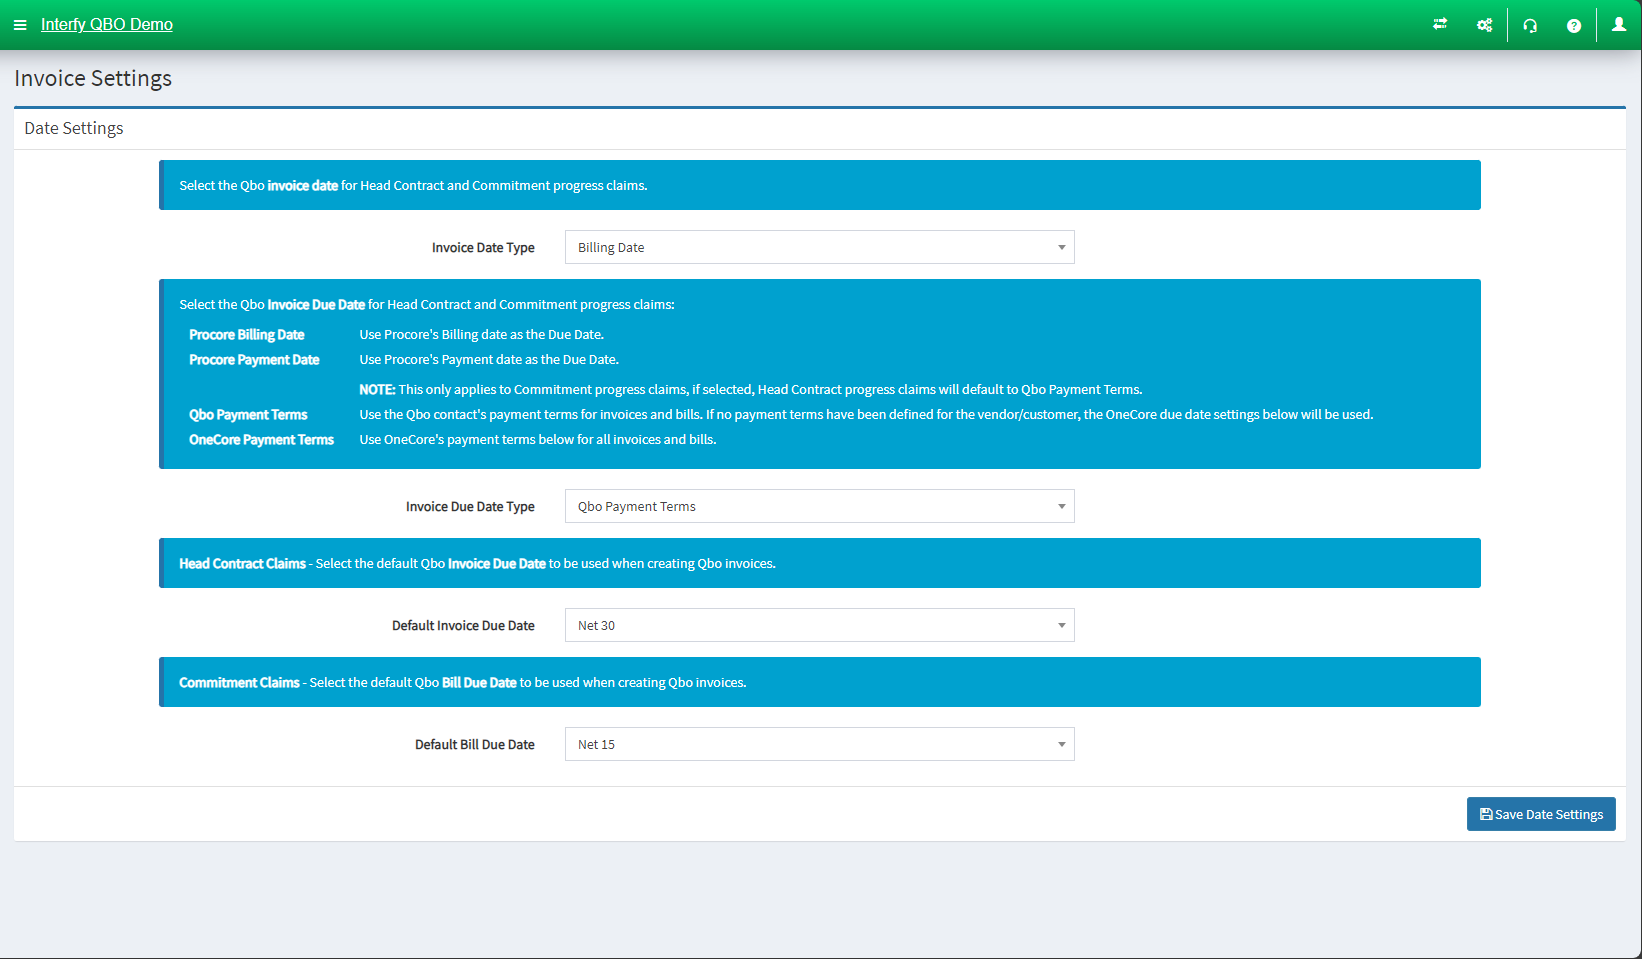
- Invoice Date Type: Set QuickBooks invoice date for Head Contract and Commitment progress claims
- Invoice Due Date Type: Set Invoice Due Date for Head Contract Claim and Commitment Progress Claim
- Default Invoice Due Date: Set the default QuickBooks Invoice Due Date to be used when creating QuickBooks invoices
- Default Bill Due Date: Set the default QuickBooks Bill Due Date to be used when creating QuickBooks Bills
Head Contract Settings:
In “General Settings“:
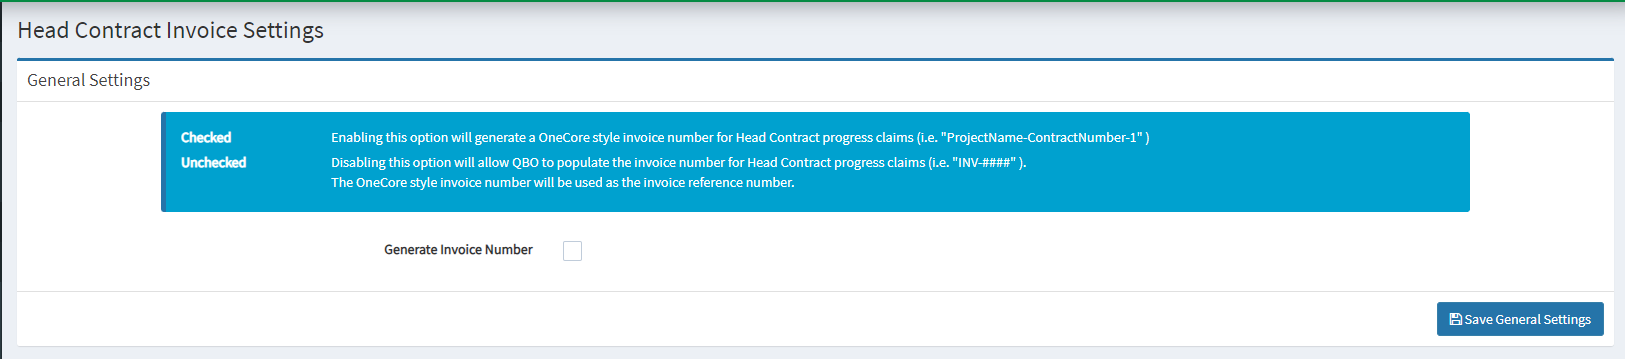
- Generate Invoice Number: choose whether the head contract claim number is generated by OneCore or QuickBooks.
Click “Save General Settings” to save the configuration.
In “Consolidated Line Item Settings“:
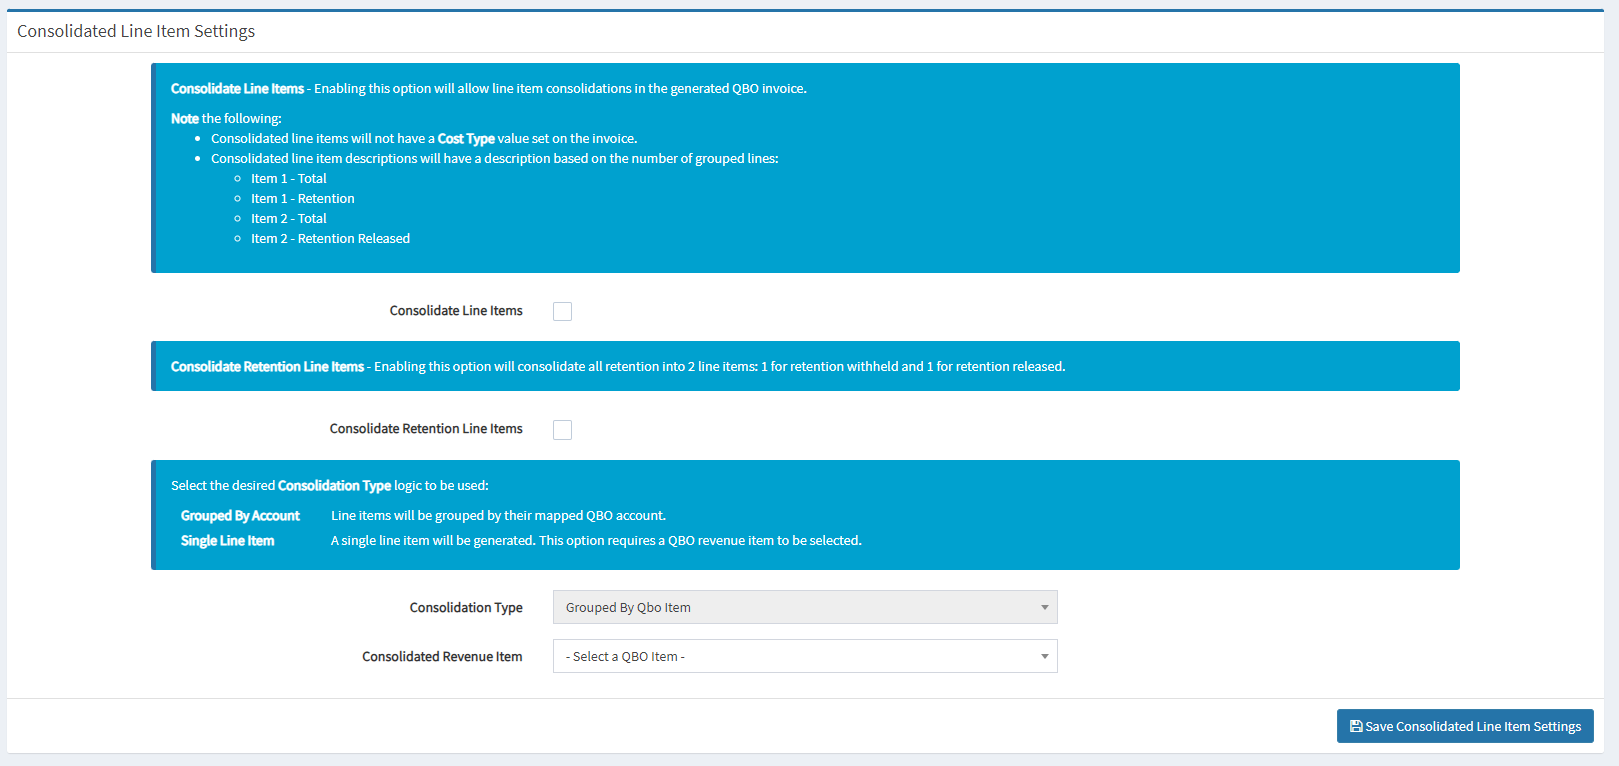
- Consolidate Line Items: set the line item consolidation upon QuickBooks invoice generation
- Consolidate Retention Line Items: Set the retention consolidation into 2 line items
- Consolidation Type: Set the consolidation type logic
- Consolidated Revenue Item: Set the QuickBooks Revenue’s Item to be selected
Click “Save Consolidated Line Item Settings” once you have finalized the configuration.
Commitment Bill Configurations:
In “General Settings“:
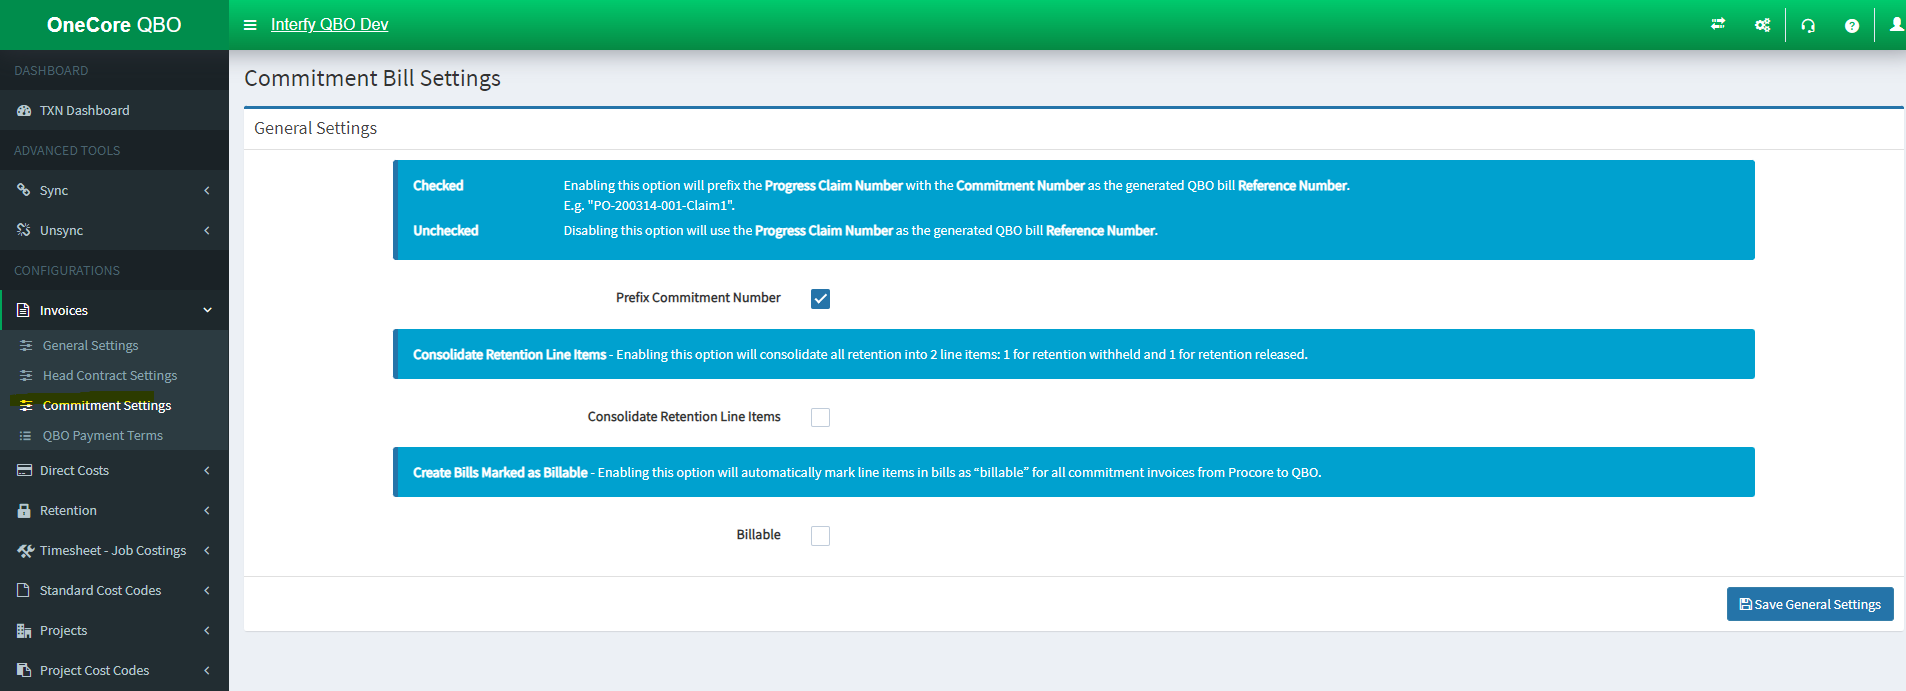
- Prefix Commitment Number: Set the prefix of Progress Claim Number with the Commitment Number upon generating QuickBooks Bill’s Reference Number
- Consolidate Retention Line Items: Set the retention consolidation into 2 line items -> 1 for retention withheld and 1 for retention released
- Billable: Enabling this will automatically mark line items in bills as “billable” for all commitment invoice from Procore to QuickBooks
QBO Payment Terms:
In “Payment Terms Setting“:
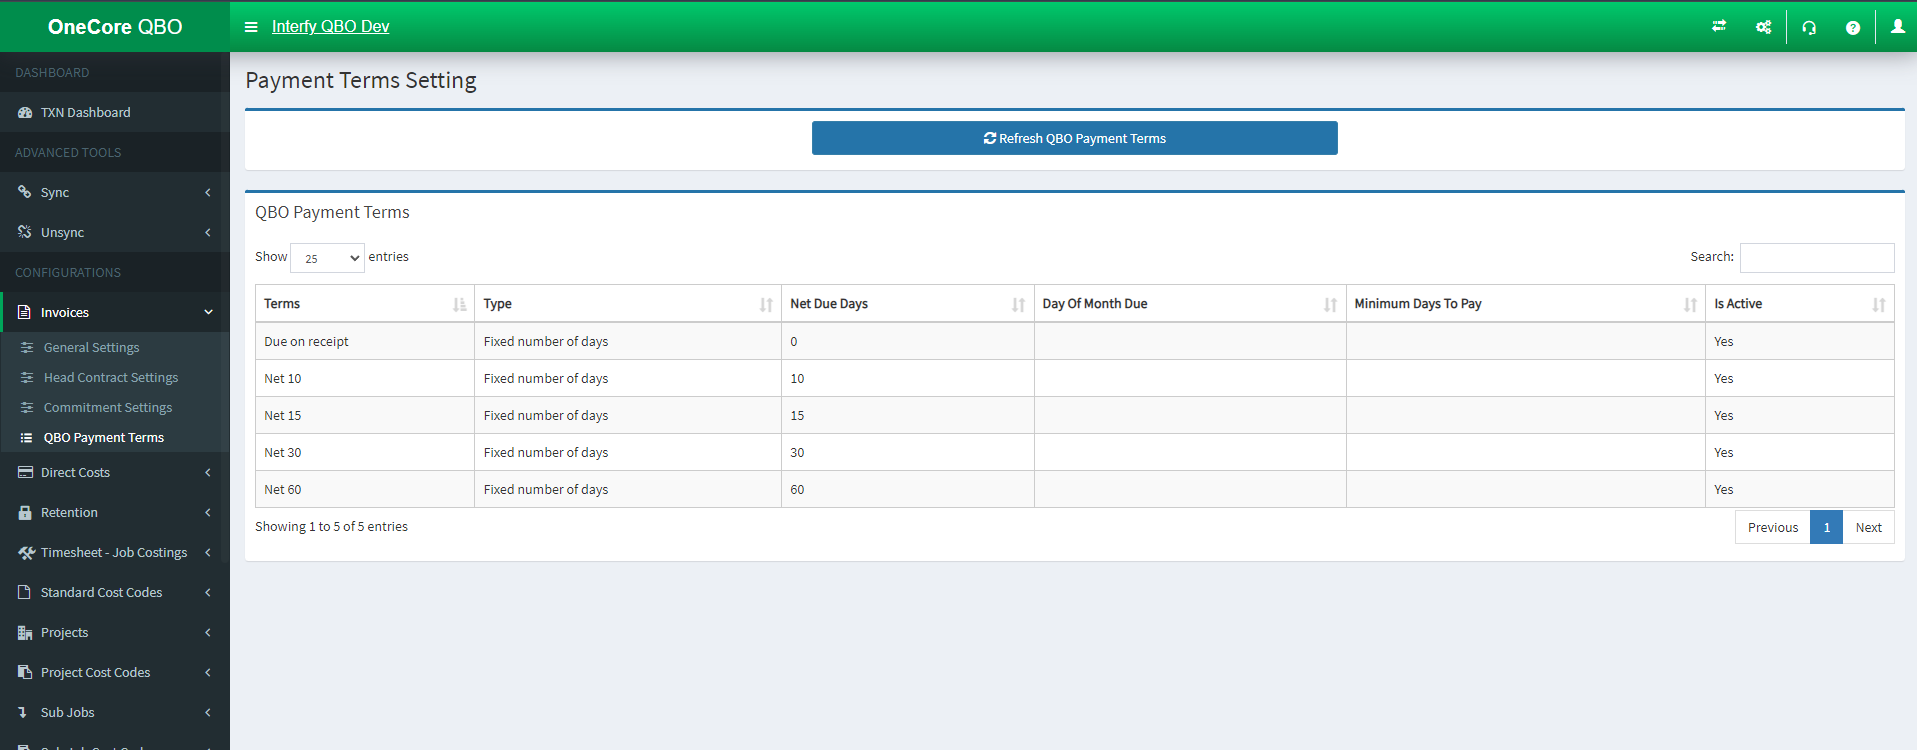
- Refresh QBO Payment Terms: Synchronizing latest payment terms data from QuickBooks Online
In the table above shows the latest payment terms data from QuickBooks Online since the last refresh that is initiated.
Direct Costs:
Direct Cost Settings:
In “General Settings“:
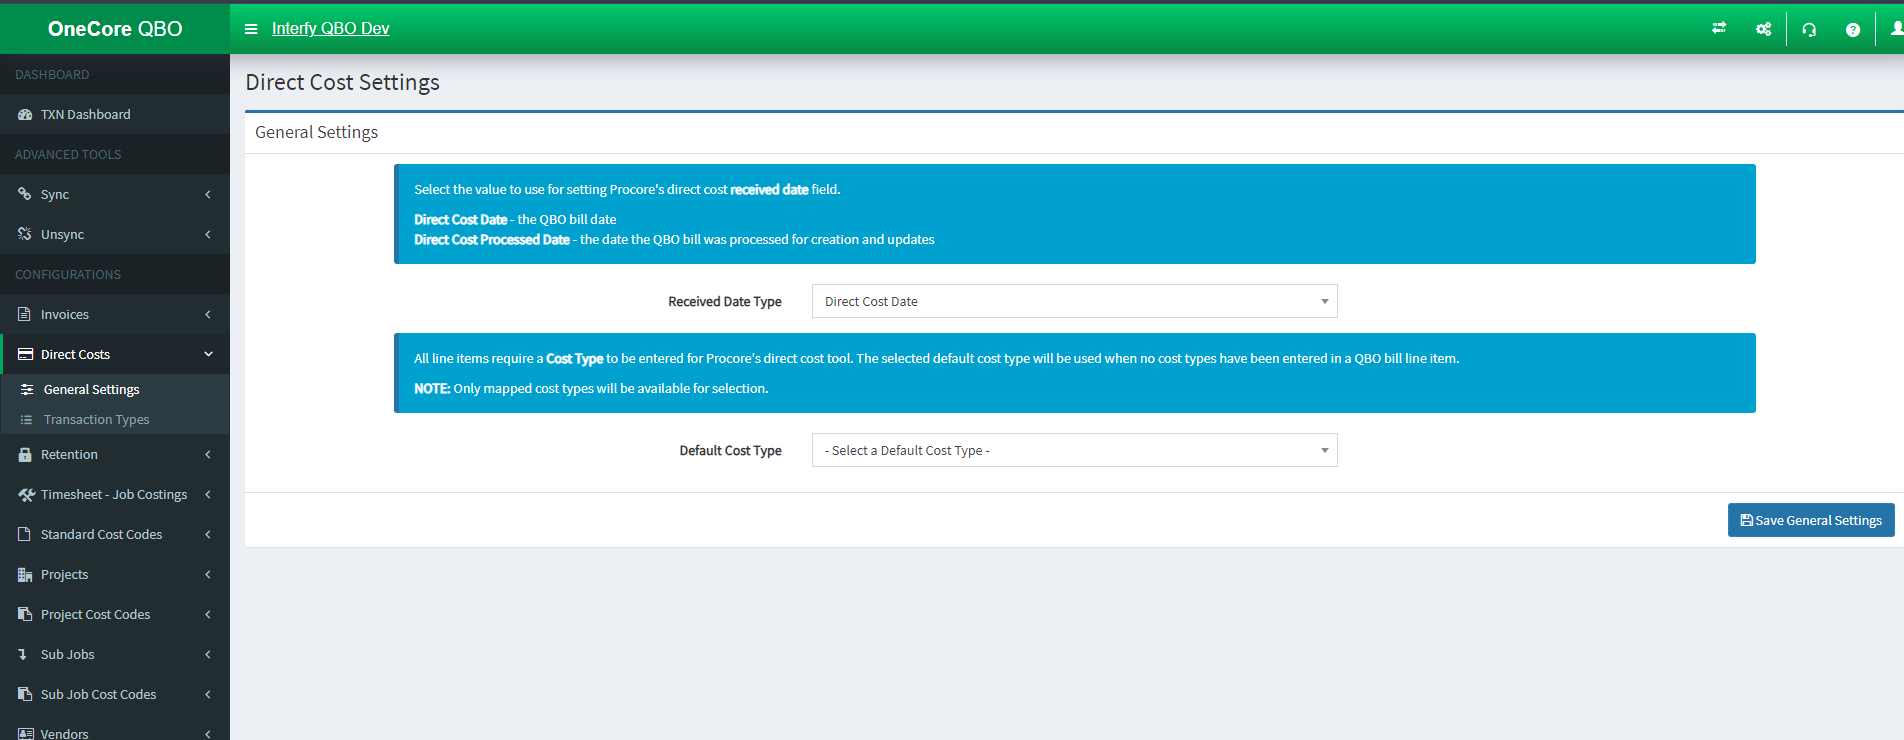
- Received Data Type: Set the value for Procore’s direct cost received date field
- Default Cost Type: Set the value for default cost type when no cost types has been selected upon generating QBO bill’s line item
Click “Save General Settings” once you have finalized the configuration.
Direct Cost Transaction Types:
In “Enable Transaction Types“:
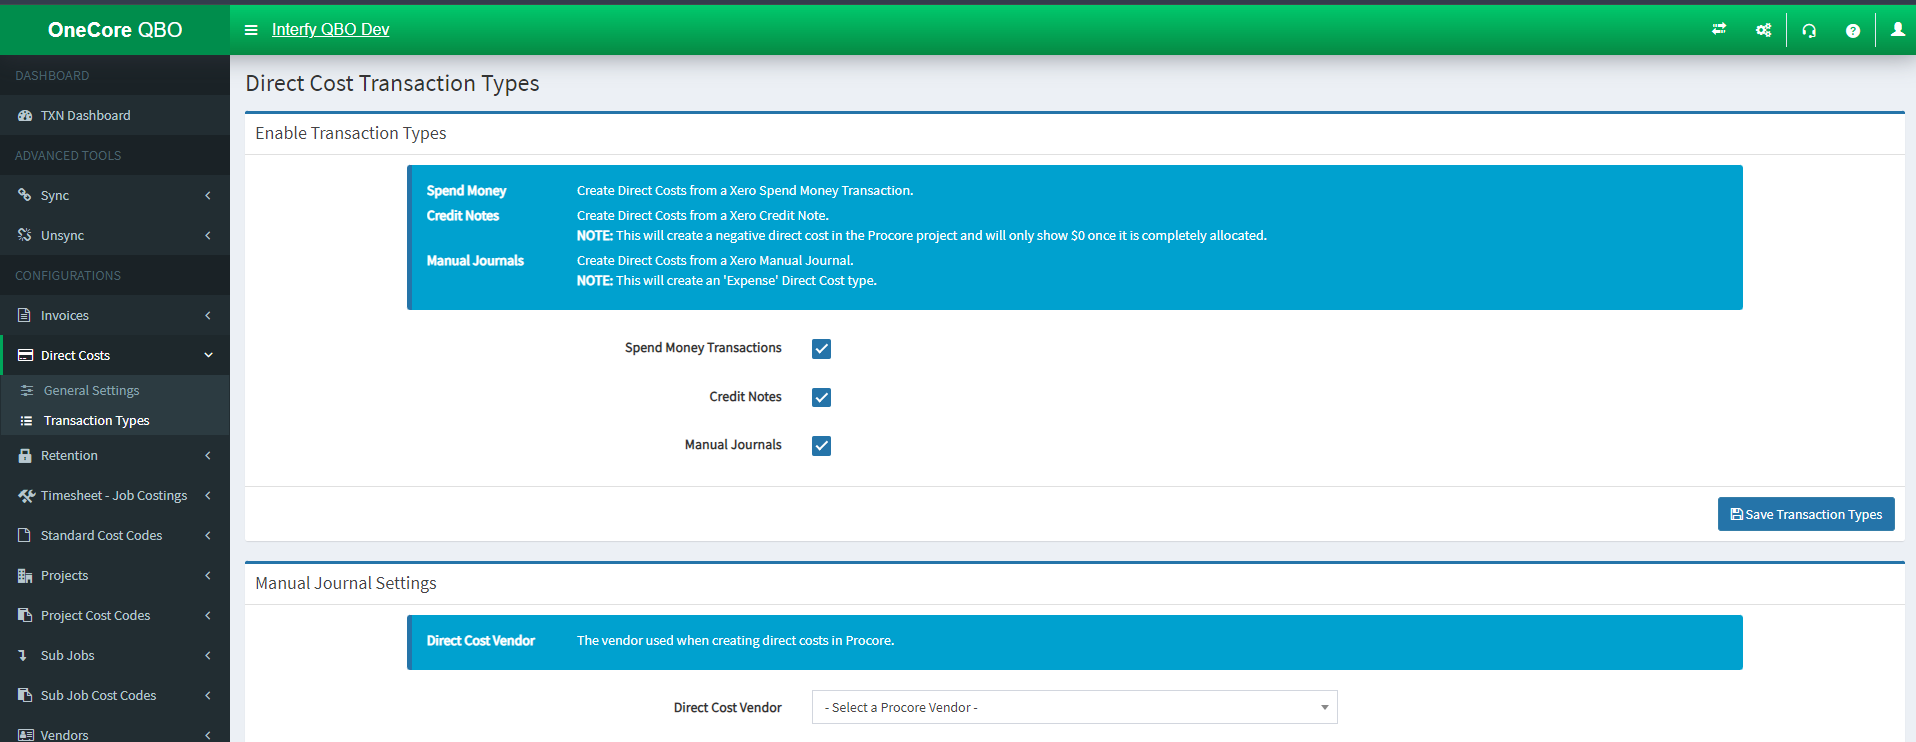
- Expense: Create Direct Cost from a QuickBooks Expense
- Credit Memo: Create Direct Cost from a QuickBooks Credit Memo
- Journal Entry: Create Direct Cost (Expense) from a QuickBooks Journal Entry
In “Manual Journal Settings“:
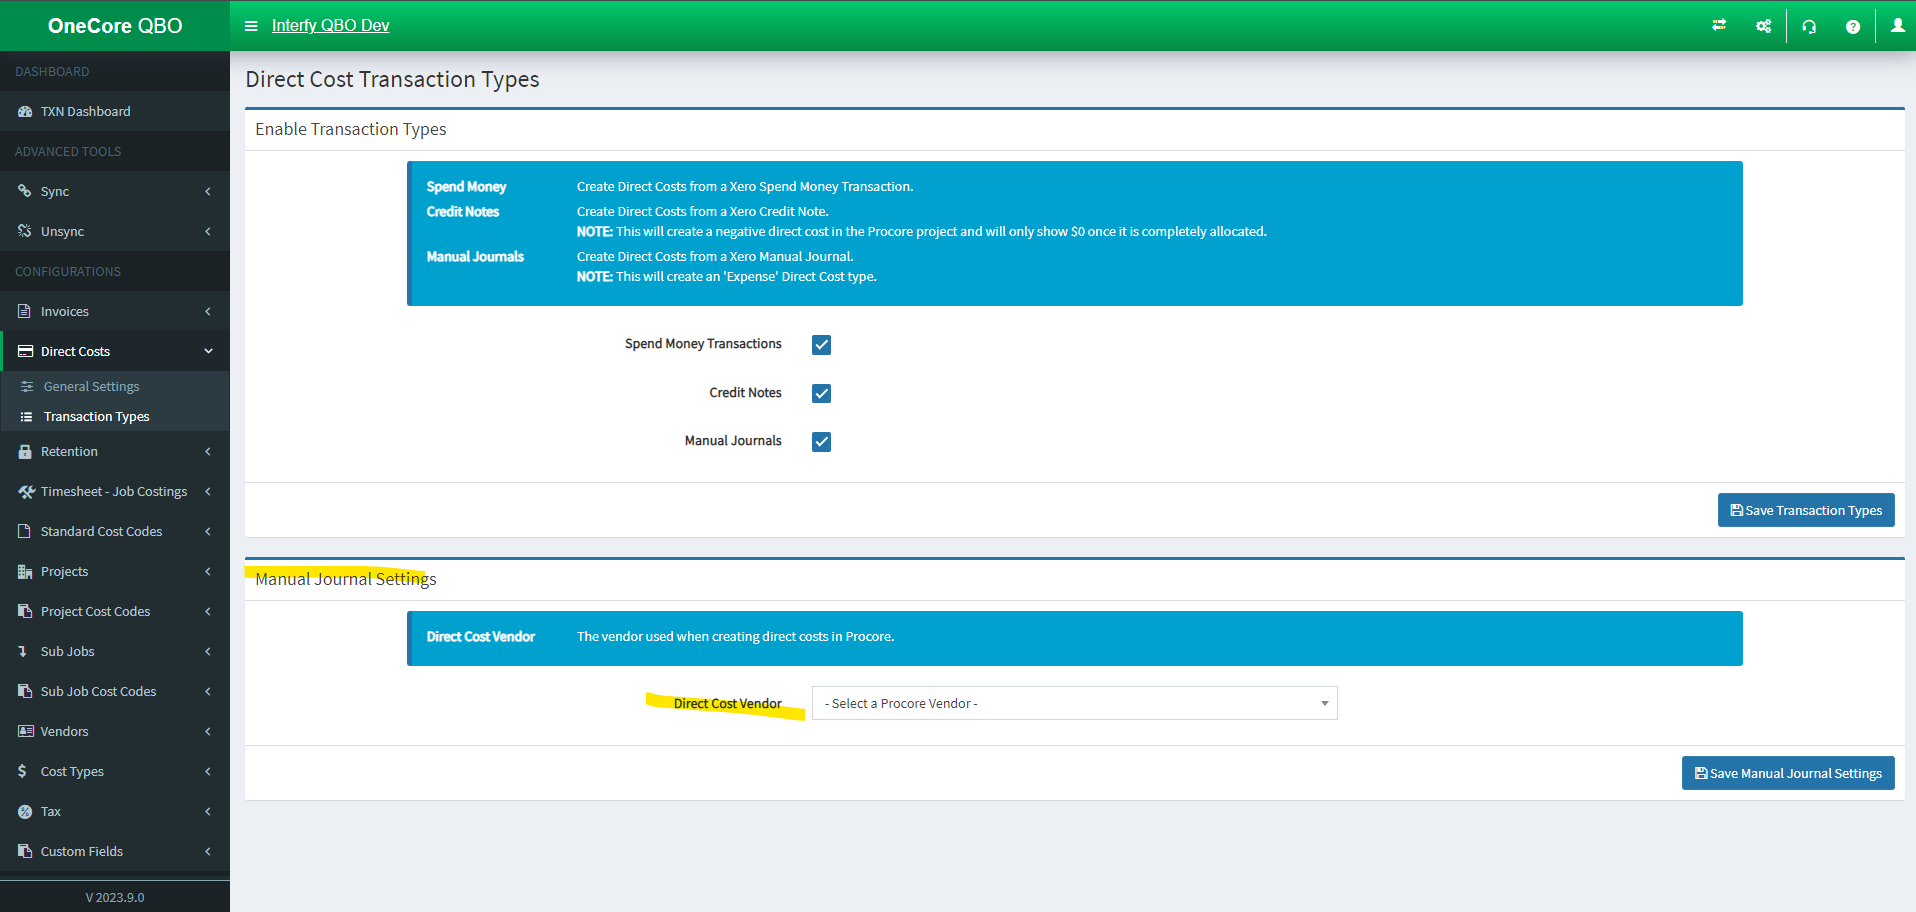
- Direct Cost Vendor: Set the vendor when creating direct costs in Procore
Retention:
Retention Settings
In “General Settings“:
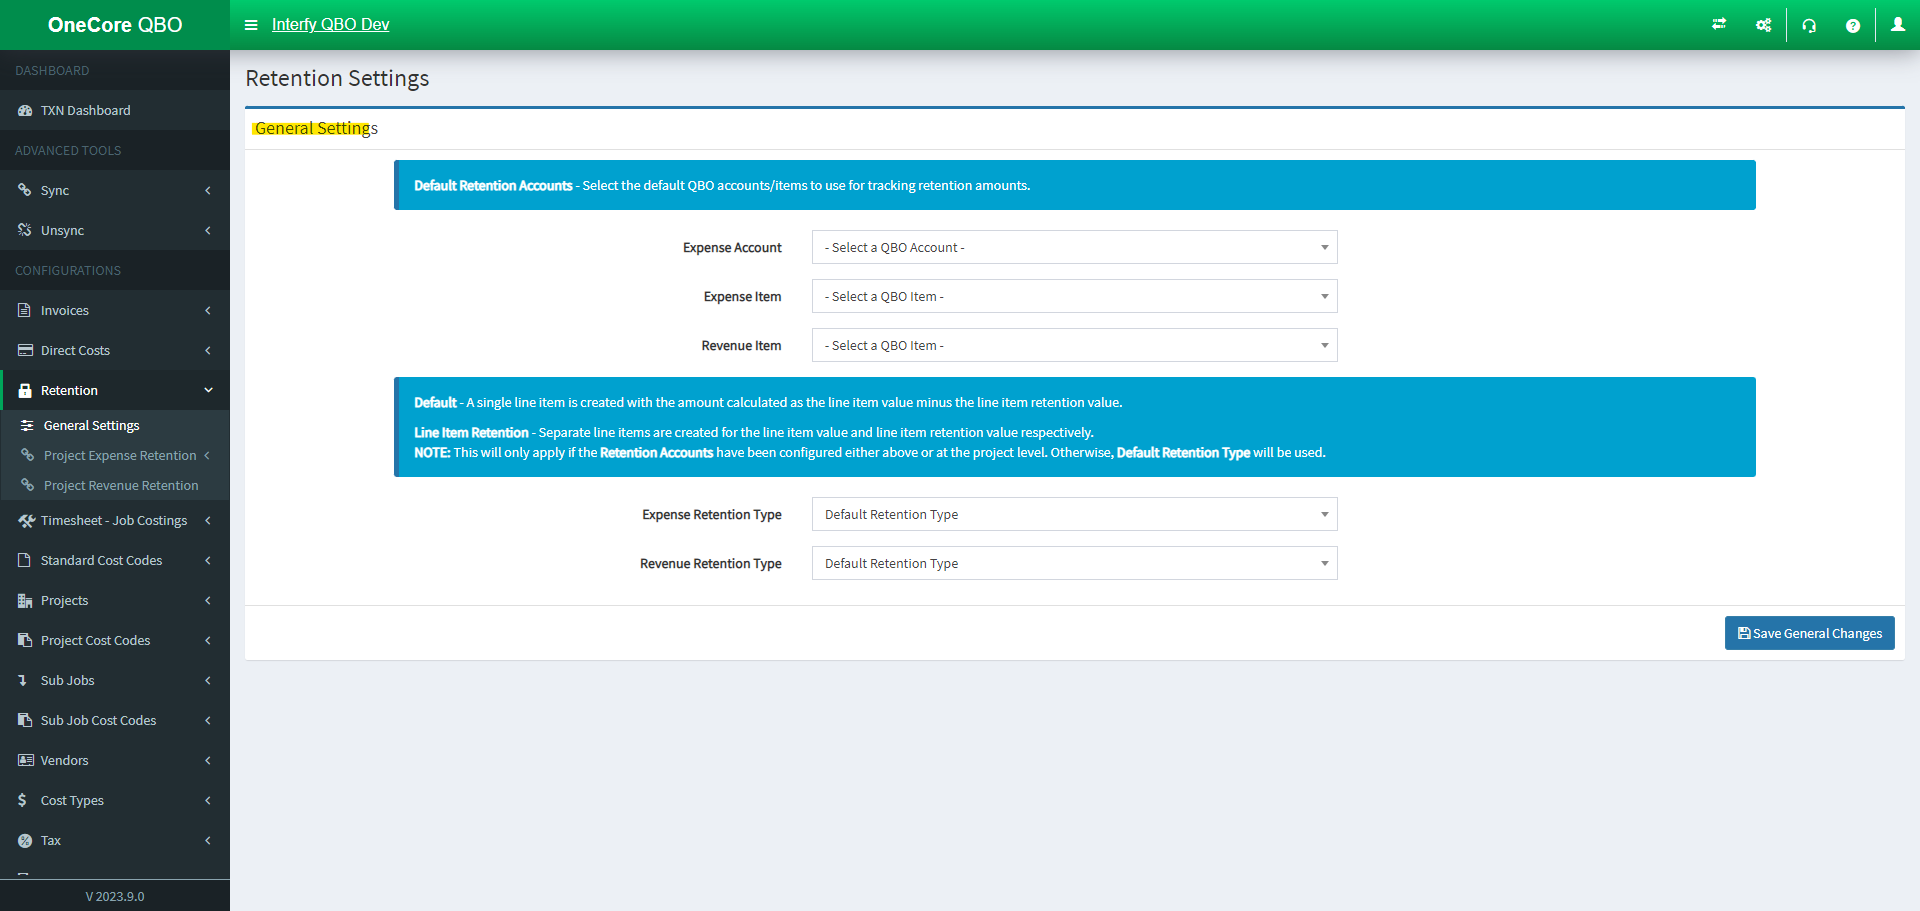
Default Retention Accounts:
-
- Expense Account: Set the default QuickBooks Expense Account to use for tracking retention amounts
- Expense Item: Set the default QuickBooks Expense Item to use for tracking retention amounts
- Revenue Item: Set the default QuickBooks Revenue Item to use for tracking retention amounts
Retention Type:
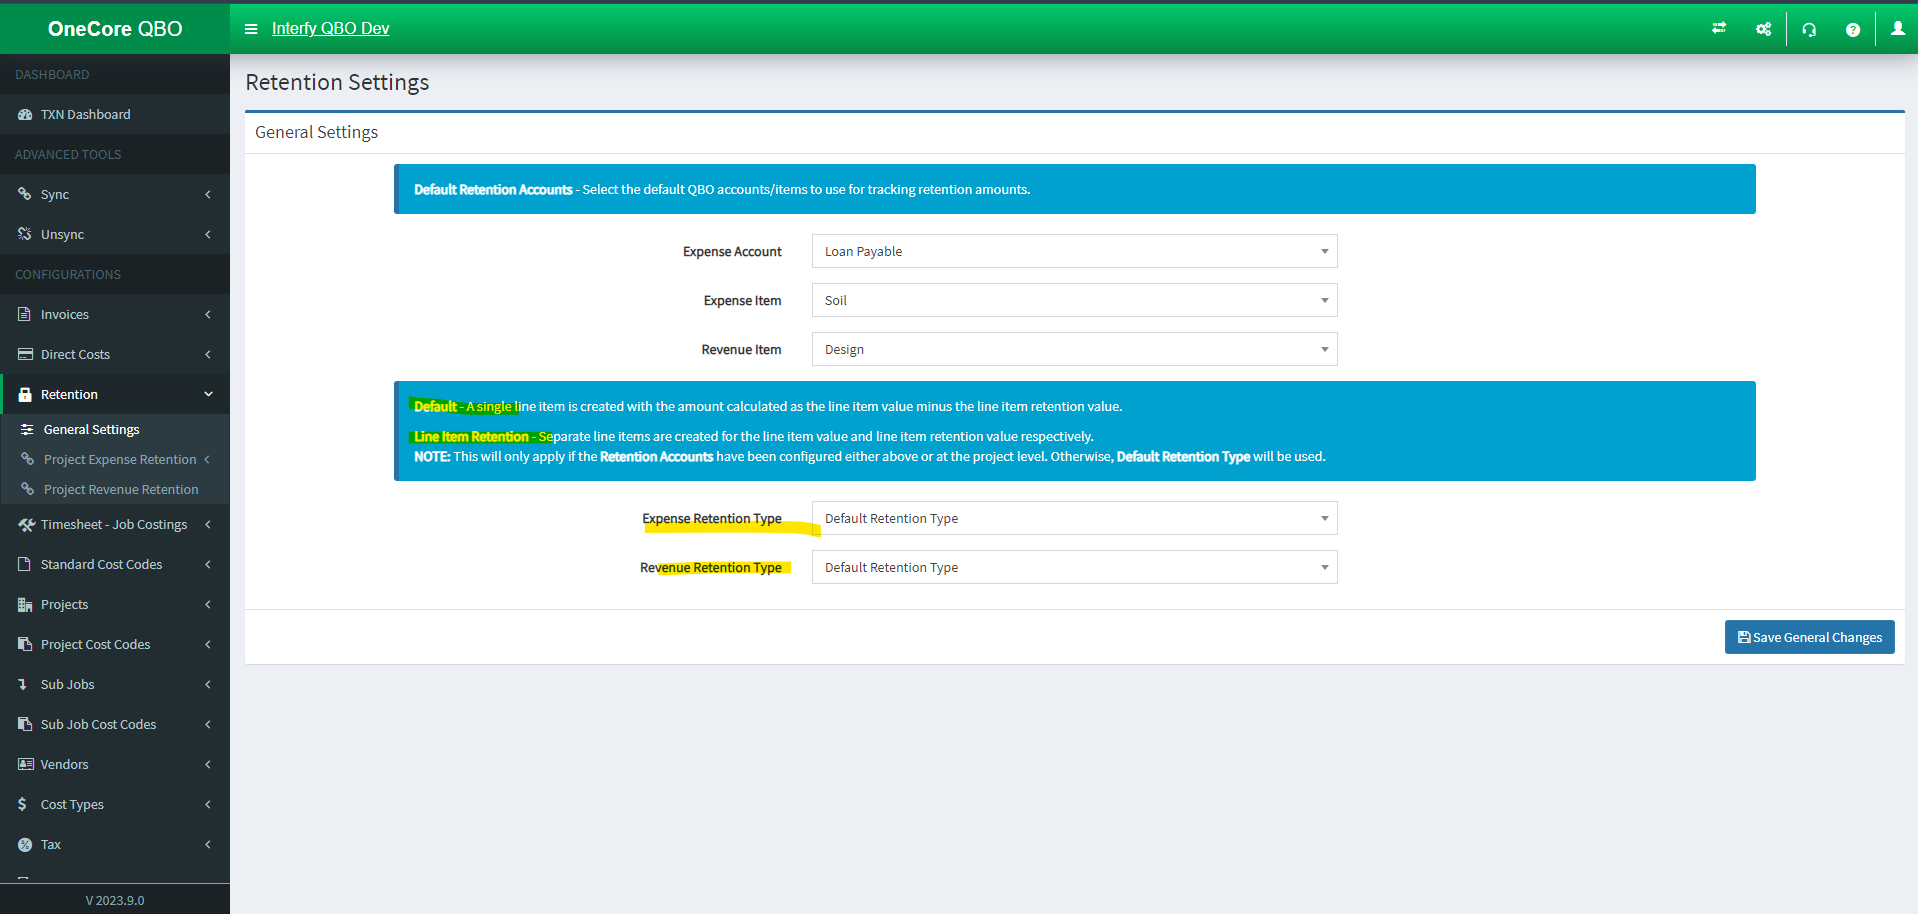
Default Retention Type – A single line item is created with the amount calculated as the line item value minus the line item retention value.
Line Item Retention Type – Separate line items are created for the line item value and line item retention value respectively.
-
- Expense Retention Type: Set the Expense Retention Type (Commitment Claim)
- Revenue Retention Type: Set the Revenue Retention Type (Head Contract Claim)
Retention has three options: General Settings, Project Expense Retention, Project Revenue Retention.
General Settings allows you to select your default retention expense and revenue accounts, if you use it, as well as setting the default retention type.
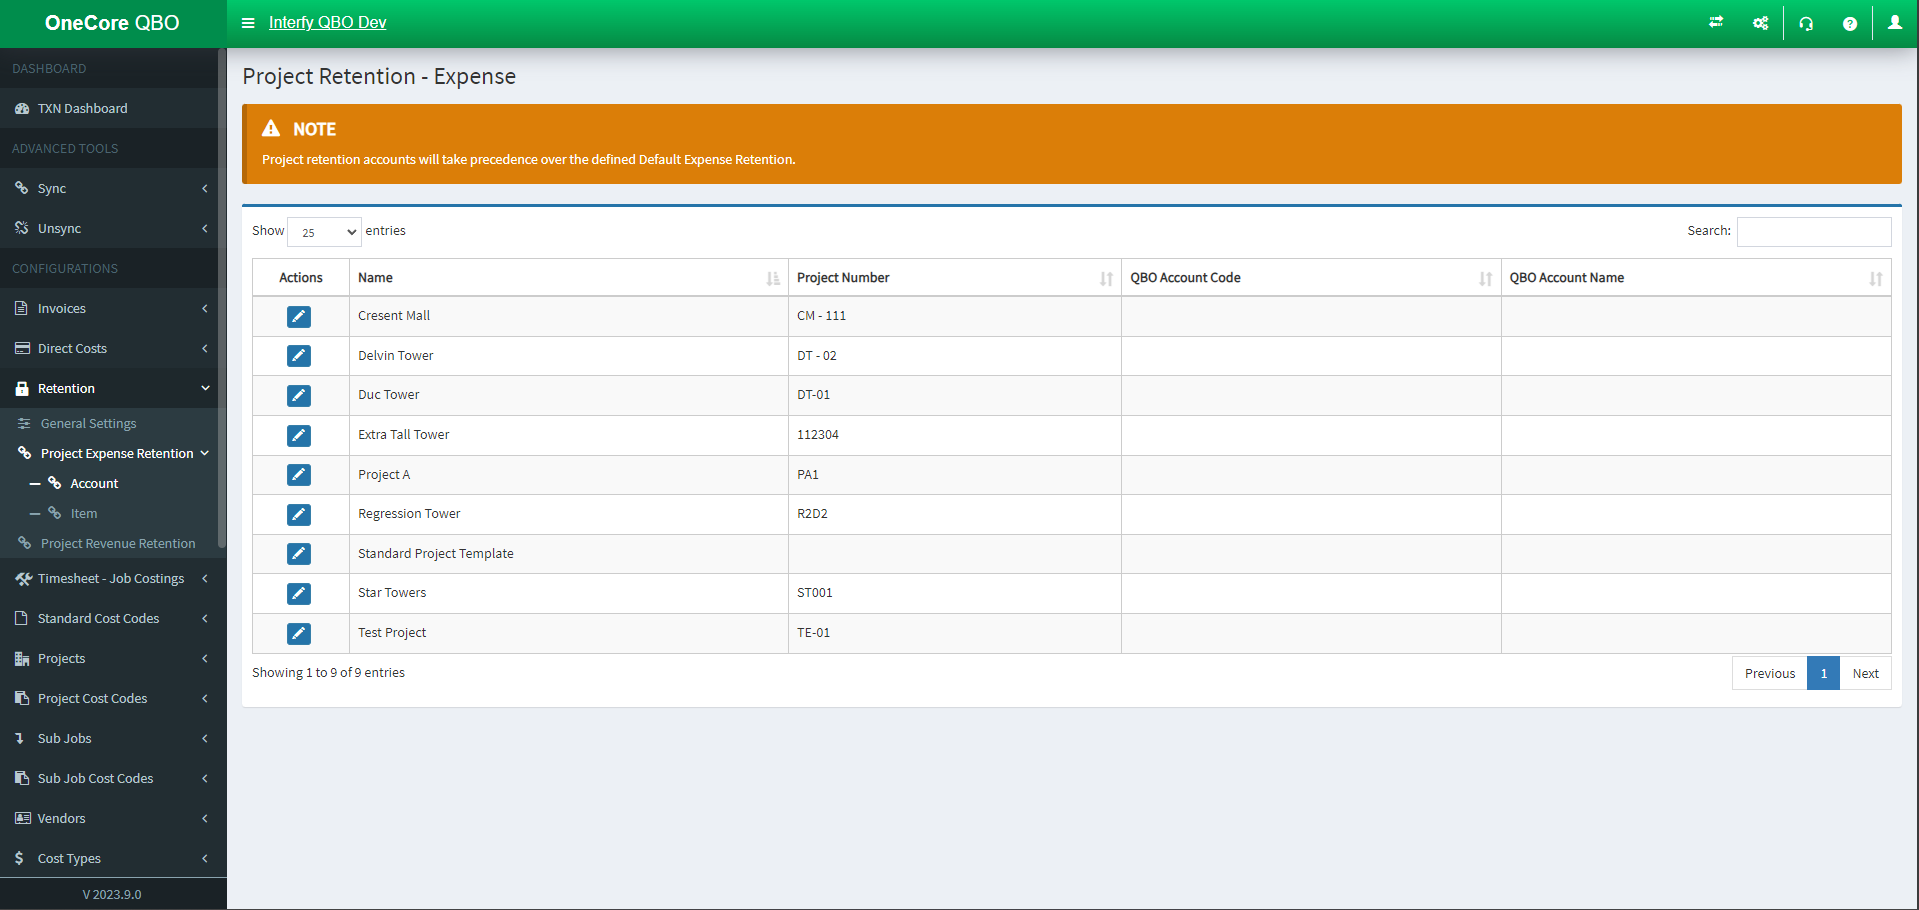
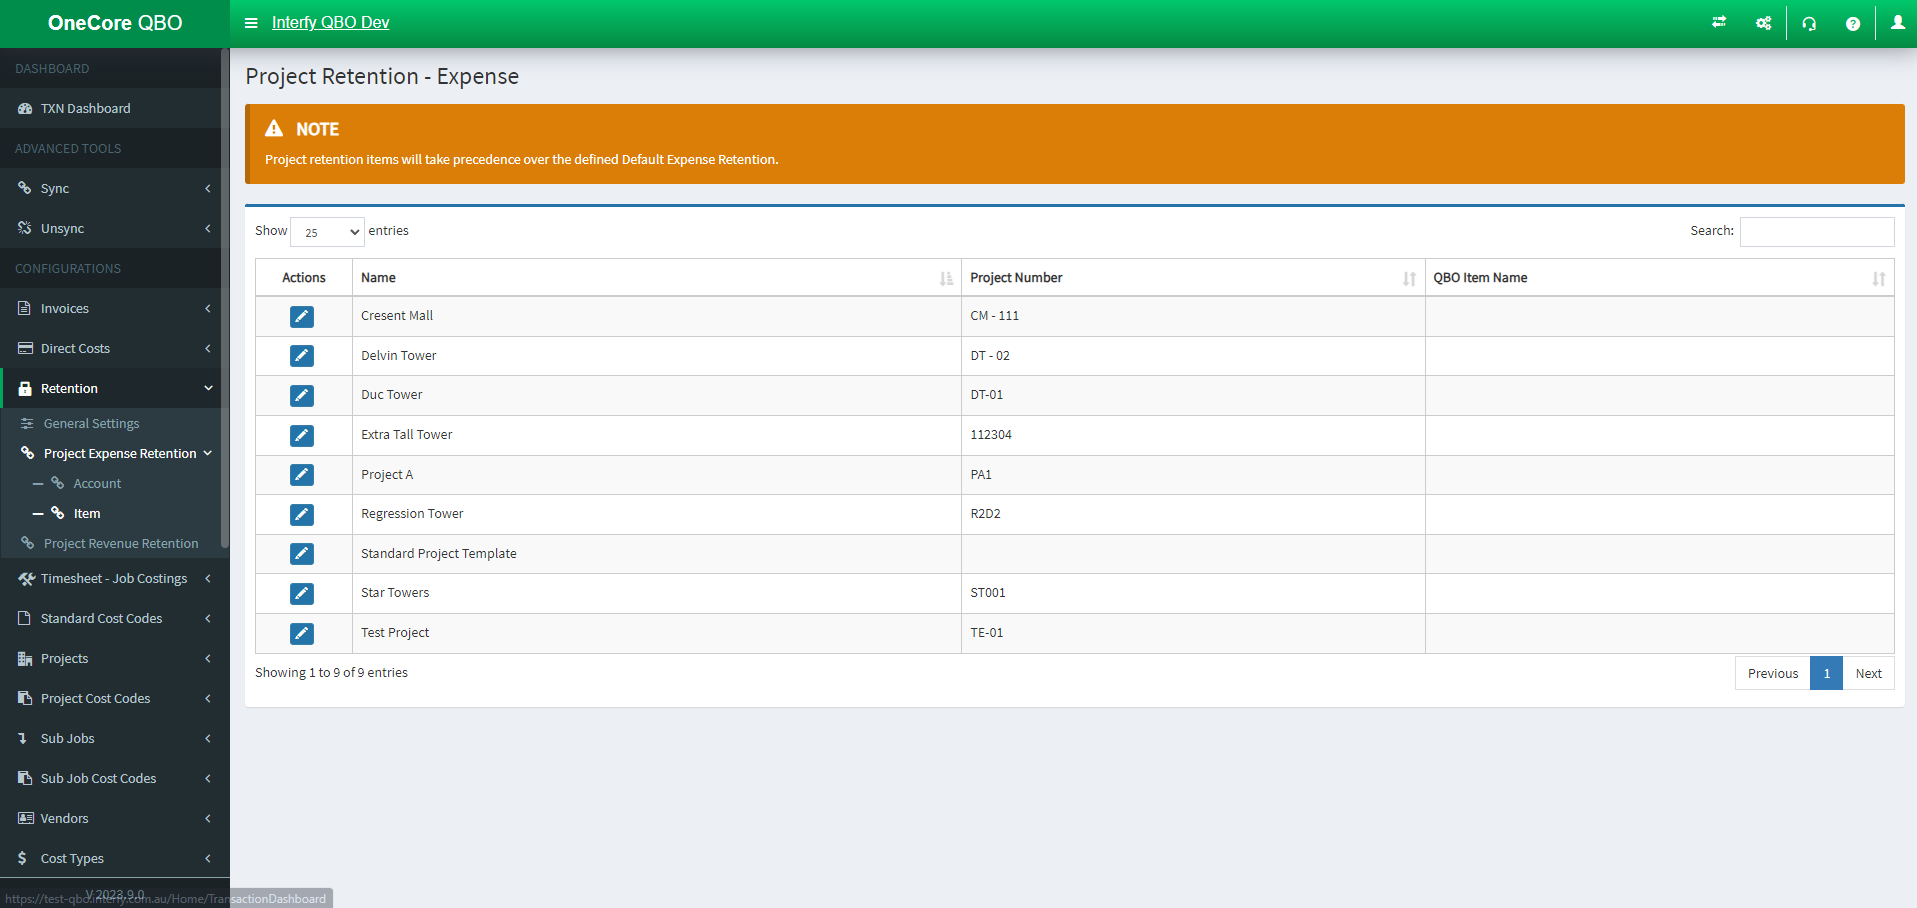
Project Expense Retention
Project Expense Retention allows you to map a default QuickBooks retention account for each project for expenses i.e. commitment claims or direct costs.
Project Expense Retention – Account
Project Expense Retention – Item
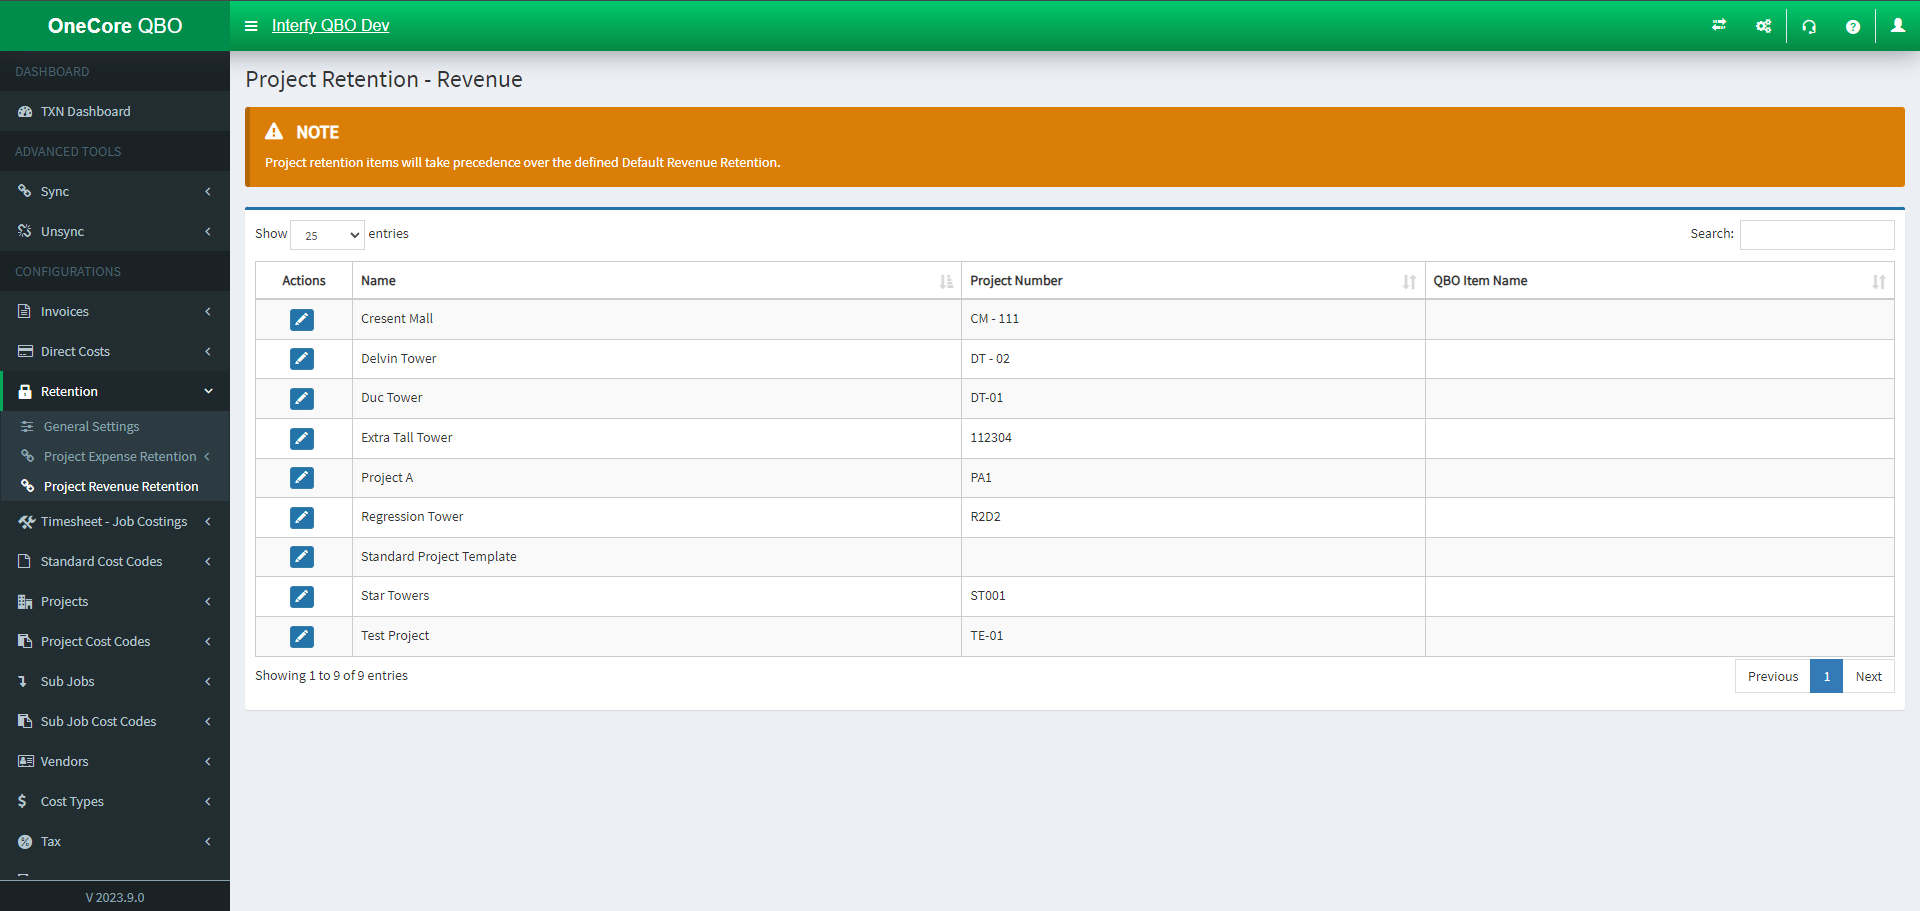
Project Revenue Retention
Project Revenue Retention allows you to map a default QuickBooks retention account for each project for revenue i.e. head contract claims.’
Standard Cost Codes:
Standard Cost Codes has four options: General Settings, Expense Mapping, Revenue Mapping, Expense Cost Division.
General Settings:
General Settings allows you to update the Procore cost code and QuickBooks account lists in OneCore, as well as set a default expense and revenue account for unbudgeted line items for commitments and head contracts within Procore.
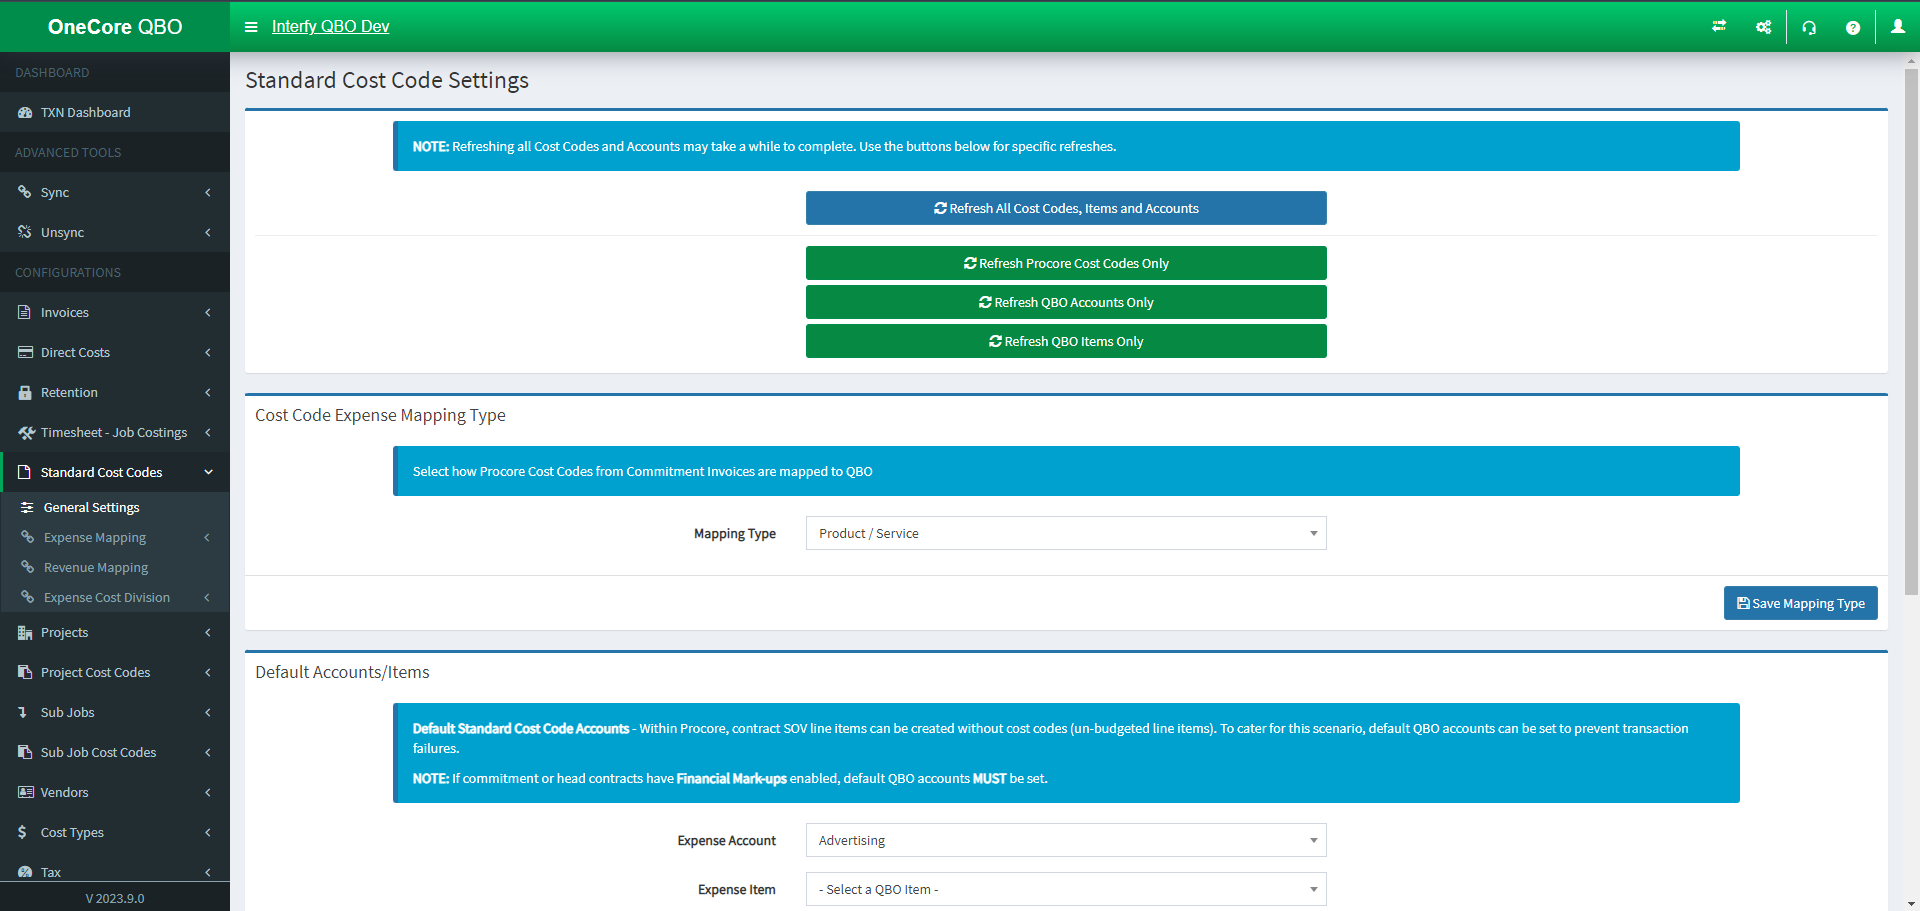
Refresh Code Code:

- Refresh All Cost Codes, Items and Accounts (Procore & QuickBooks)
- Refresh Procore Cost Codes Only (Procore)
- Refresh QuickBooks Accounts Only (QuickBooks)
- Refresh QuickBooks Items Only (QuickBooks)
Cost Code Expense Mapping Type:

- Mapping Type: Set Category or Product / Service upon generating QuickBooks Bill
Click ‘Save Mapping Type’ when you finalised your selection.
Default Accounts / Items:
Within Procore, contract SOV line items can be created without cost codes (un-budgeted line items). To cater for this scenario, default QBO accounts can be set to prevent transaction failures.
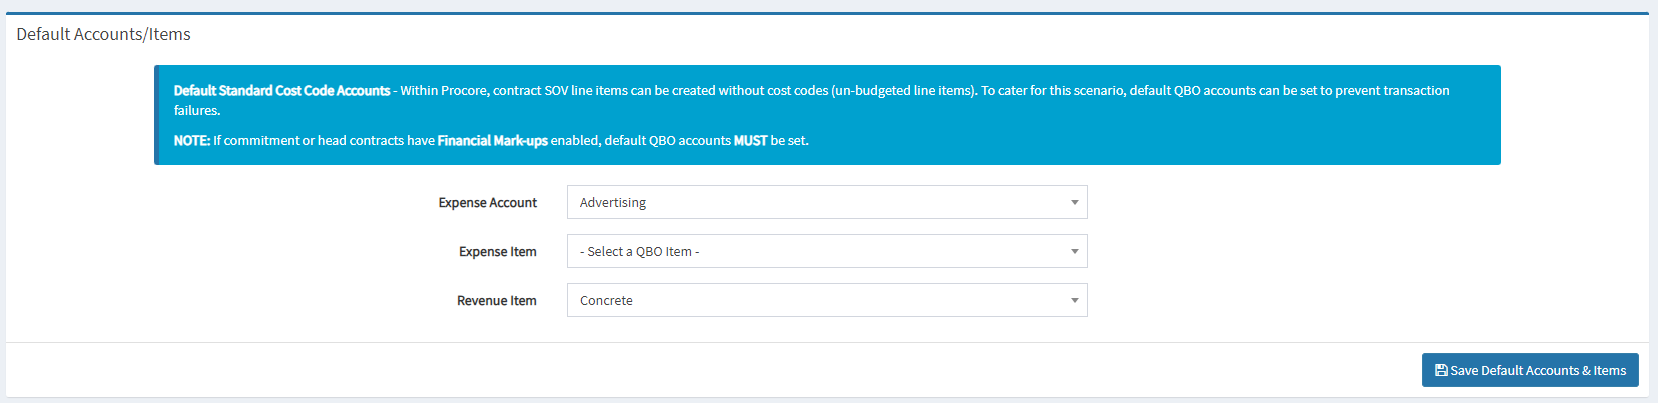
- Expense Account: Set default Expense QuickBooks Account
- Expense Item: Set default Expense QuickBooks Item
- Expense Account: Set default Revenue QuickBooks Item
Click ‘Save Default Accounts & Items‘ when you finalised your selection.
Account Mappings:
Toggle cost code mappings to additional in the QBO account types:

- Revenue Accounts
- Asset Accounts
- Liability Accounts
- Equity Accounts
Expense Mapping:
Expense Mapping allows you to:
- Auto-map Procore cost codes to QuickBooks expense accounts (Account/ Item) by name or code
- Delete established mapping
- Manually map them from unmapped cost codes.
Standard Cost Code Mapping – Expense – Account
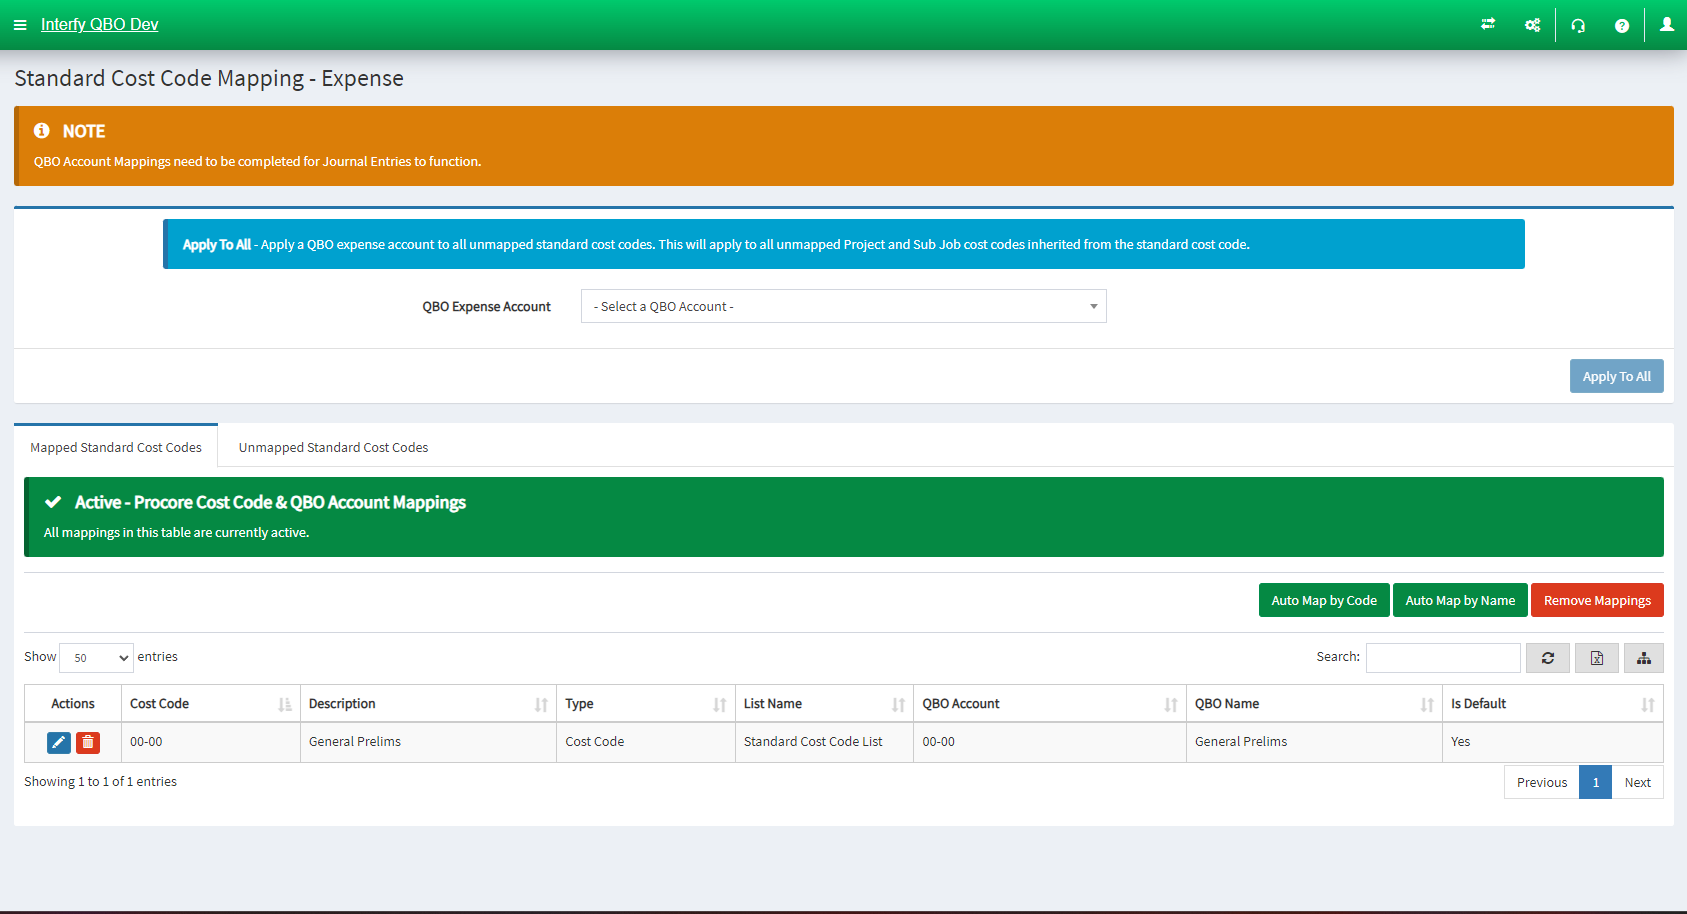
- Apply to All feature: Apply QuickBooks Expense Account to all unmapped Standard Cost Codes
- Mapped Standard Cost Codes: Active mappings
- Unmapped Standard Cost Codes: Set your cost code mapping here
Standard Cost Code Mapping – Expense – Item
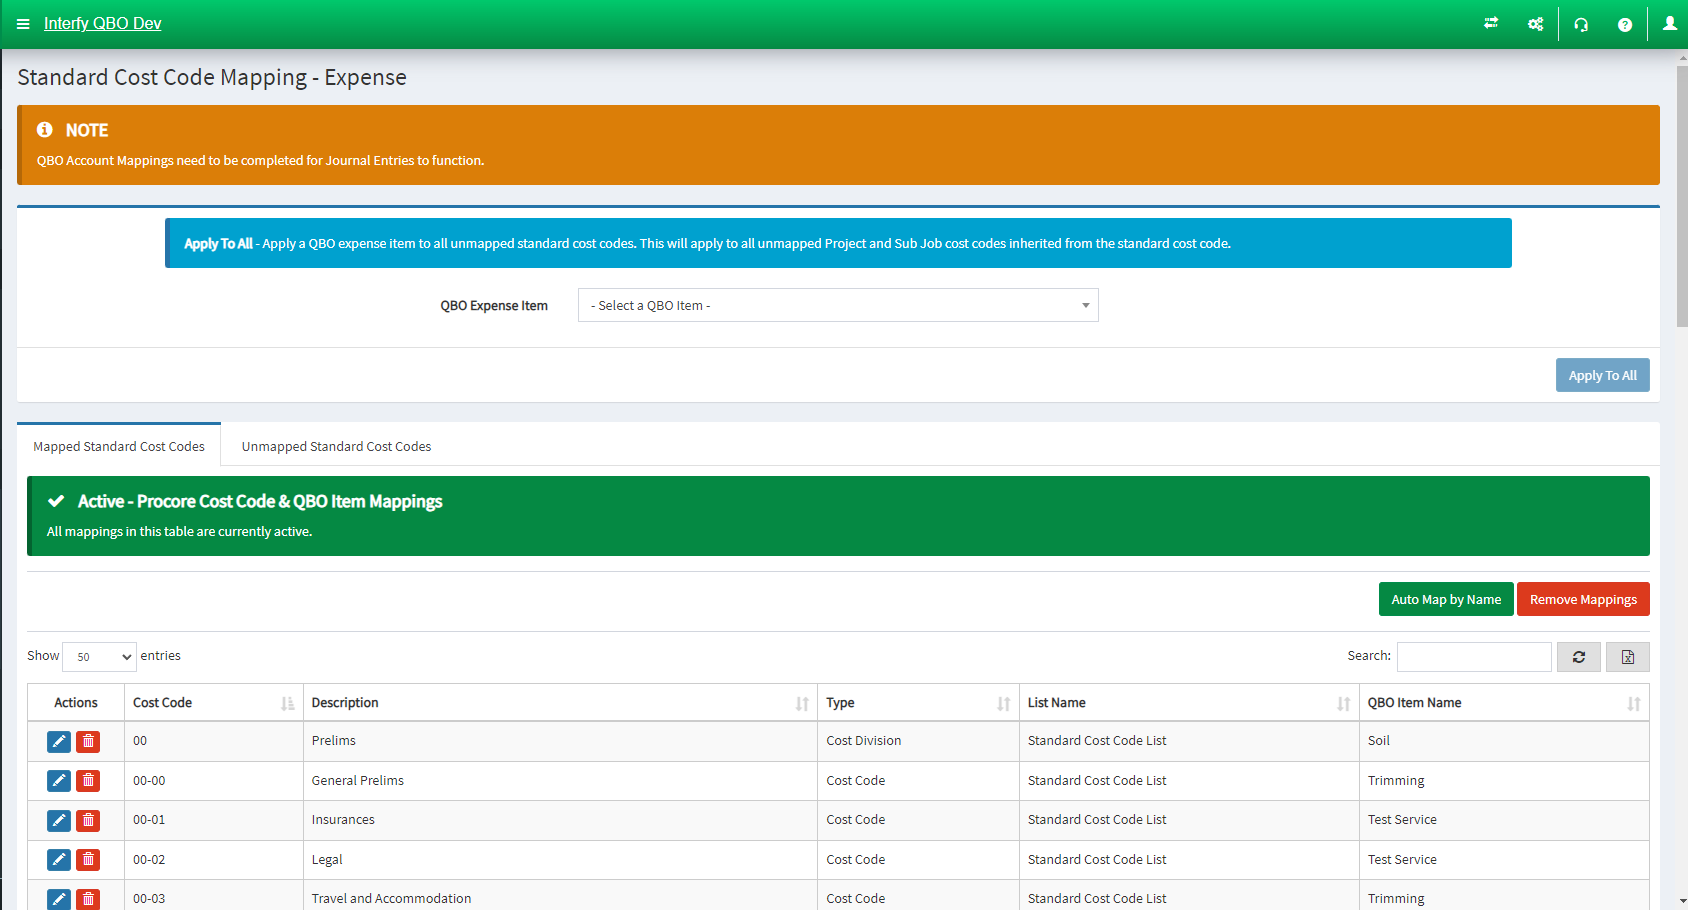
- Apply to All feature: Apply QuickBooks Expense Item to all unmapped Standard Cost Codes
- Mapped Standard Cost Codes: Active mappings
- Unmapped Standard Cost Codes: Set your cost code mapping here
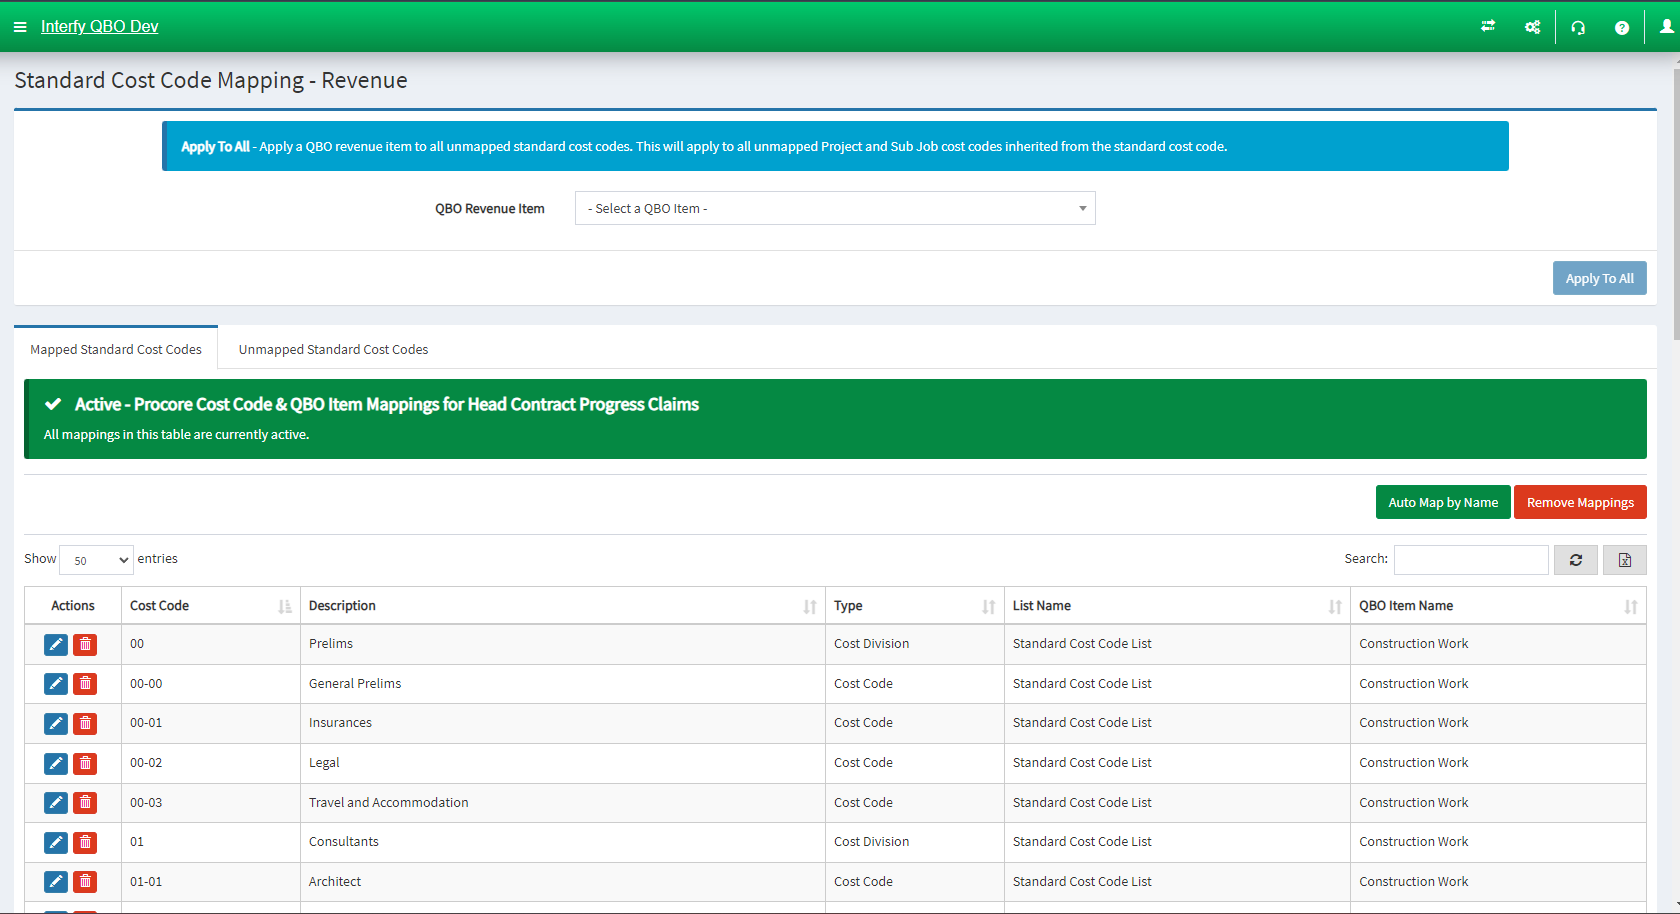
Revenue Mapping:
Revenue Mapping allows you to
- Auto-map Procore cost codes to QuickBooks revenue item by name or code
- Delete established mapping
- Manually map them from unmapped cost codes.
Expense Cost Division (Optional):
This mapping only be required if there are unbudgeted commitments created with an SOV containing cost divisions.
Expense Cost Division allows you to:
- Manually map Procore Cost Divisions to QuickBooks Accounts
- Delete established mapping
Standard Cost Code Division Mapping – Expense – Account
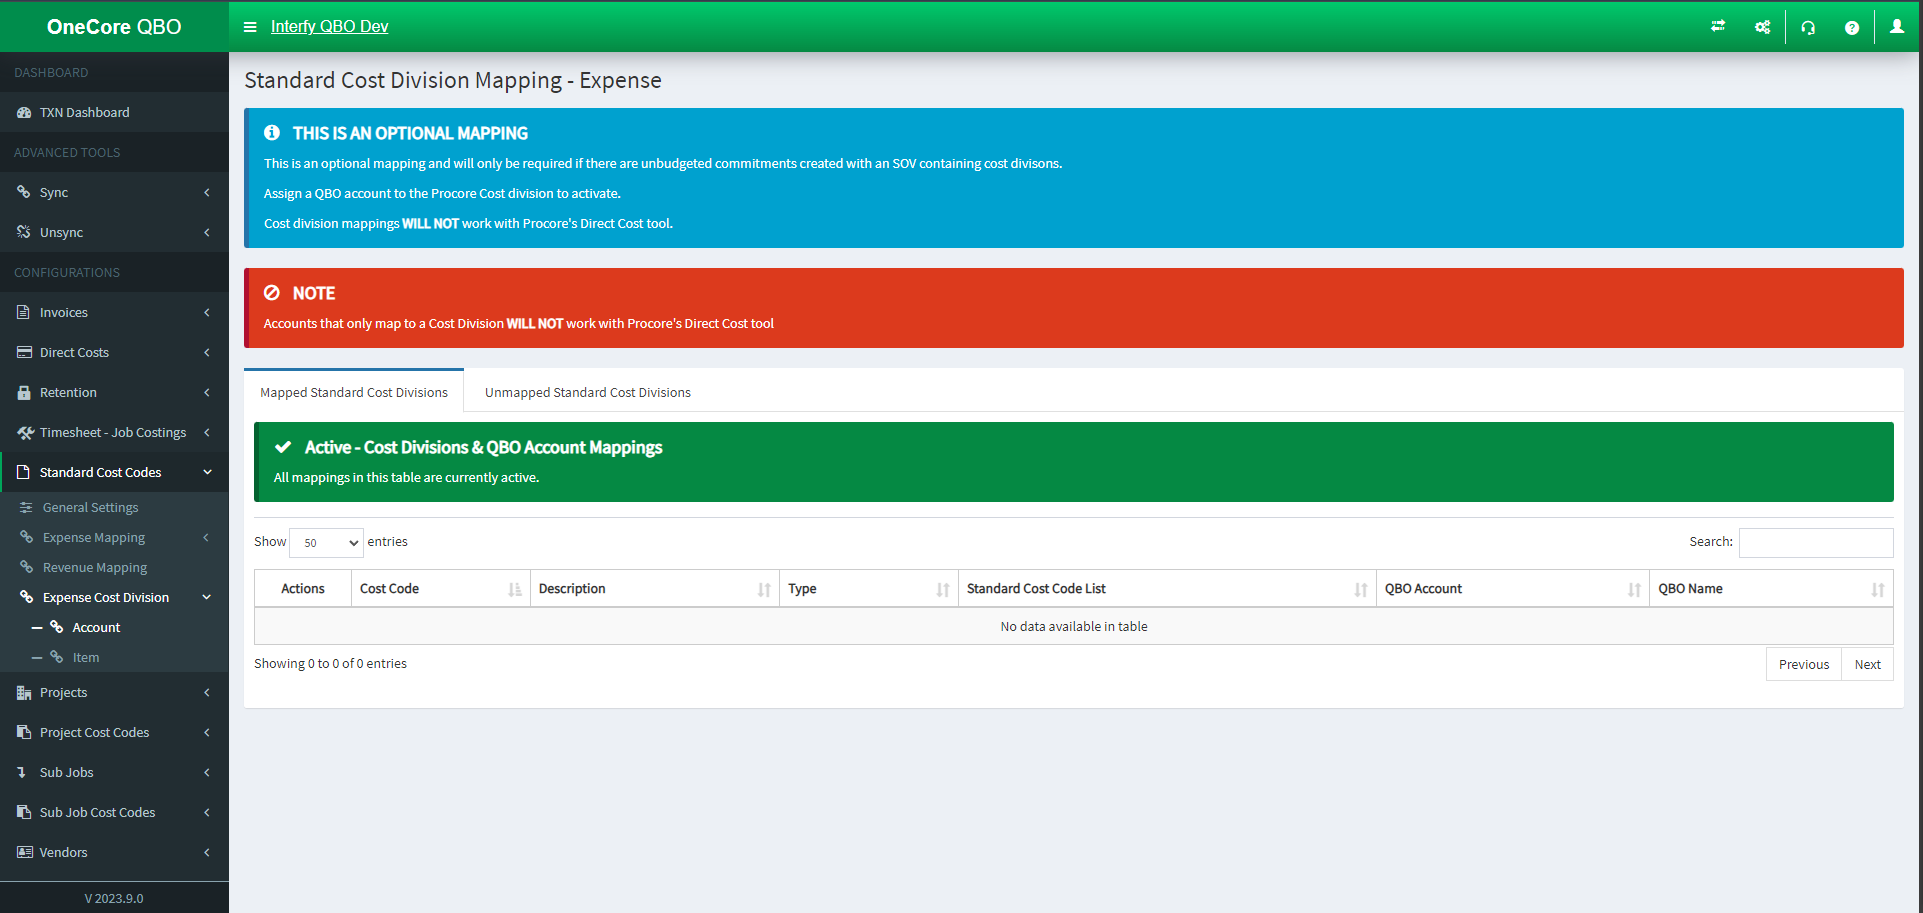
- Mapped Standard Cost Divisions: Active mappings
- Unmapped Standard Cost Divisions: Set your cost code division mapping here
Standard Cost Code Division Mapping – Expense – Item
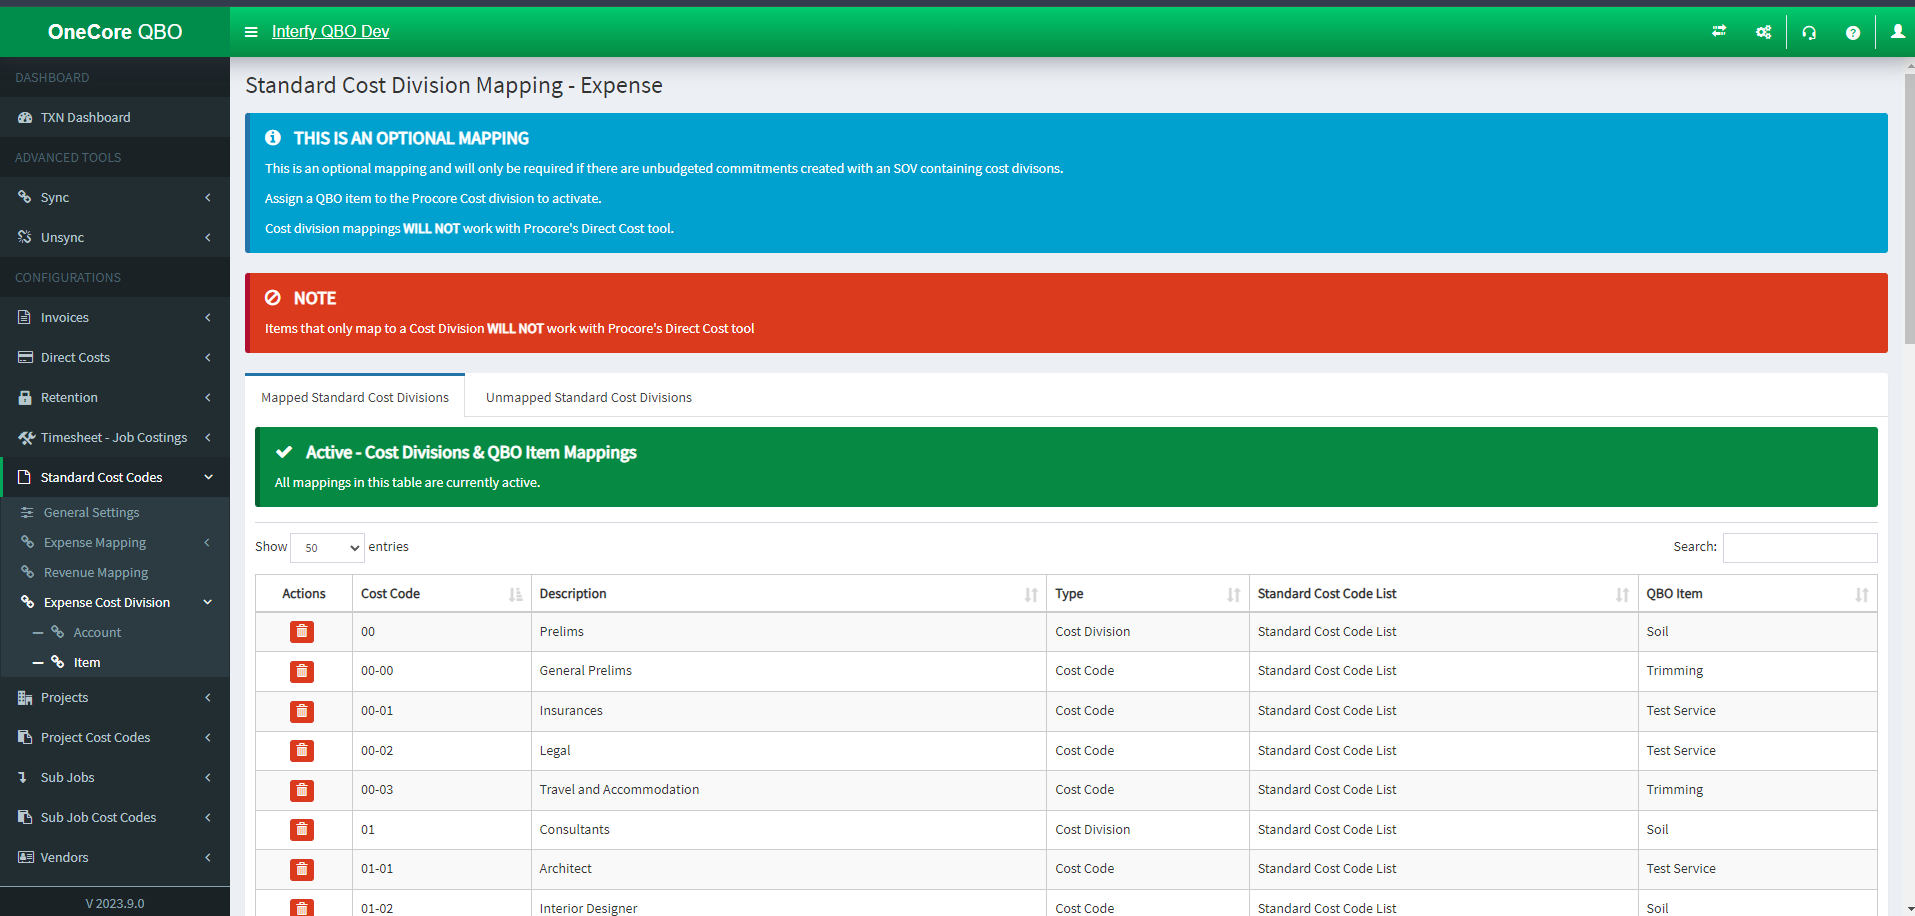
- Mapped Standard Cost Divisions: Active mappings
- Unmapped Standard Cost Divisions: Set your cost code division mapping here
Projects:
Projects has four options: General Settings, Project Mapping
General Settings
General Settings allows you to update the Procore Projects and QuickBooks Projects lists in OneCore, as well as set Custom Fields Settings, and configure General Settings.
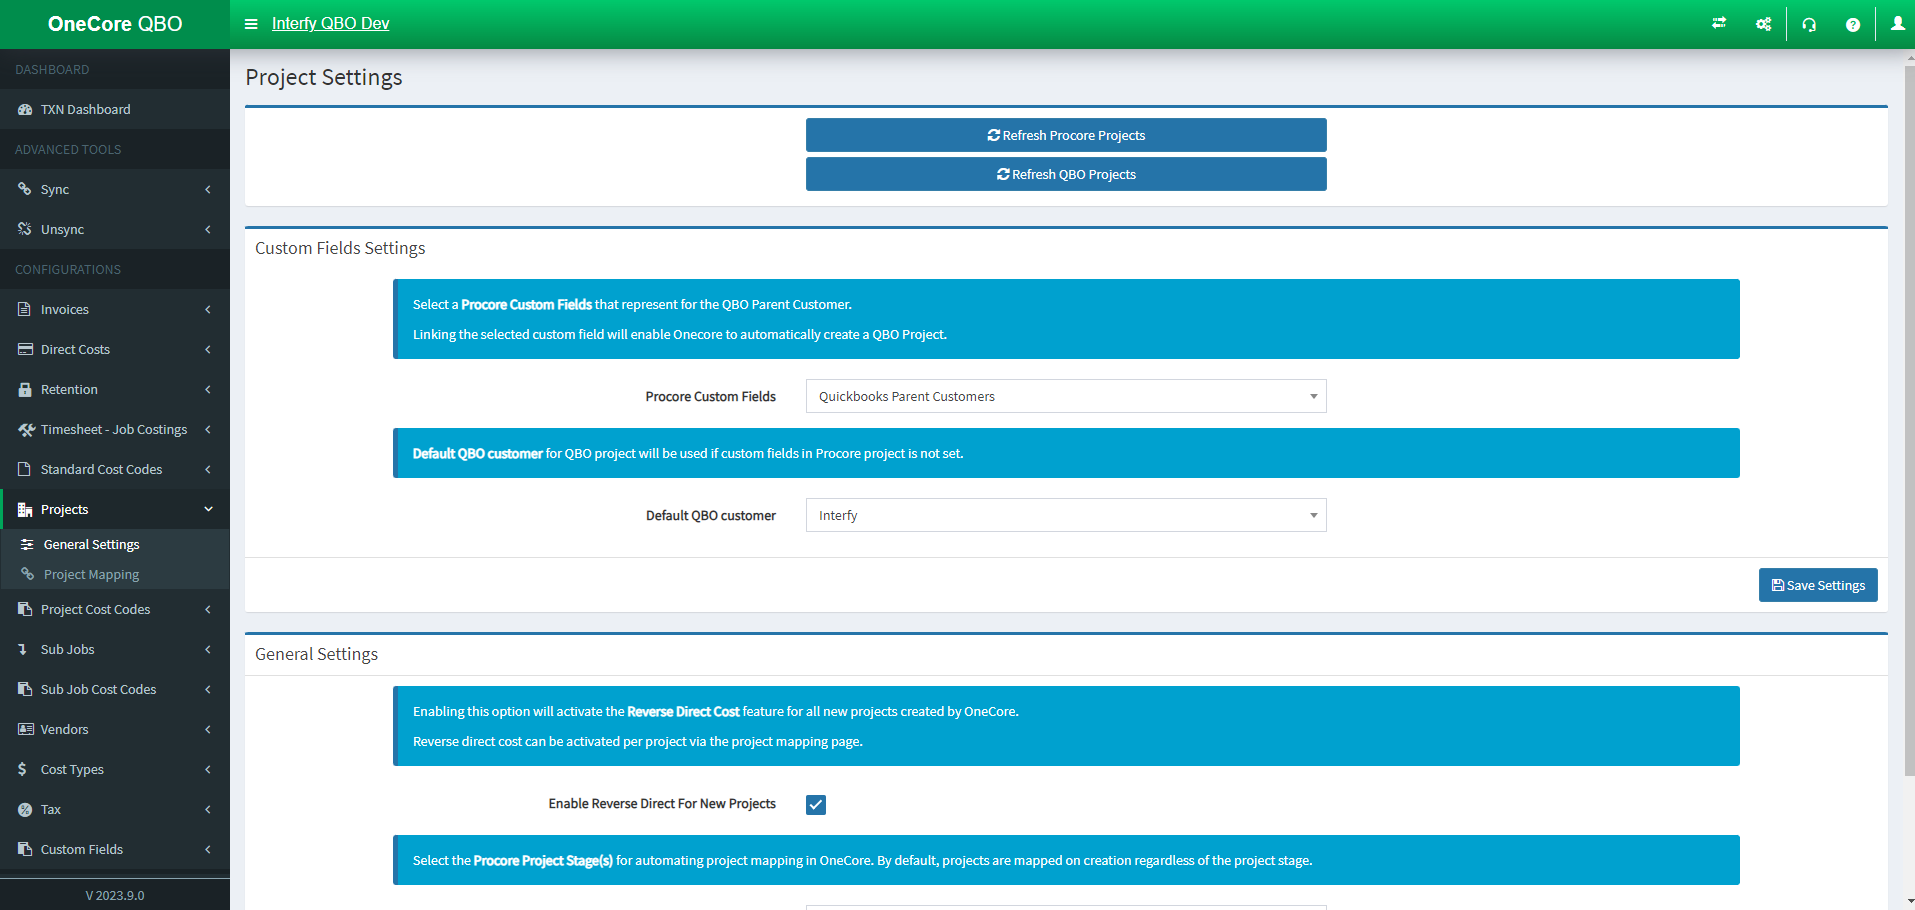
Refresh Projects:

- Refresh Procore Projects (Procore)
- Refresh QBO Projects (QuickBooks)
Custom Fields Settings:
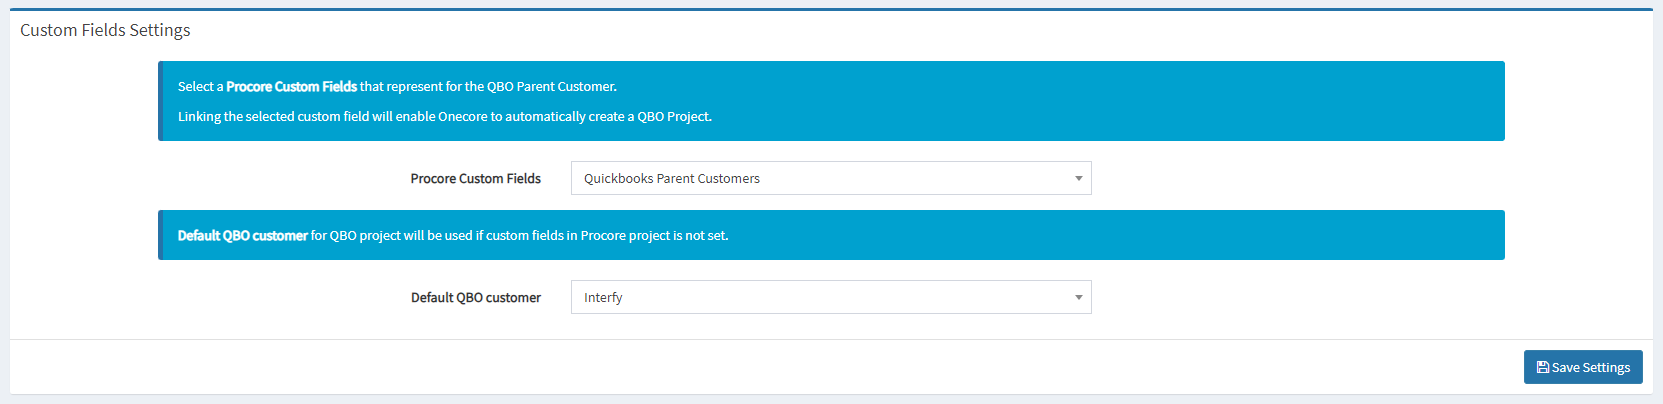
- Procore Custom Fields: Select a Procore Custom Fields that represents the QBO parent Customer
- Default QBO Customer: Default QuickBooks Project will be used if custom fields in Procore project is not set
General Settings:

- Enable Reverse Direct For New Projects: Activate/deactivate the Reverse Direct Cost feature for all projects created by OneCore
- Project Stage: Automating project mapping in OneCore
Project Mapping:
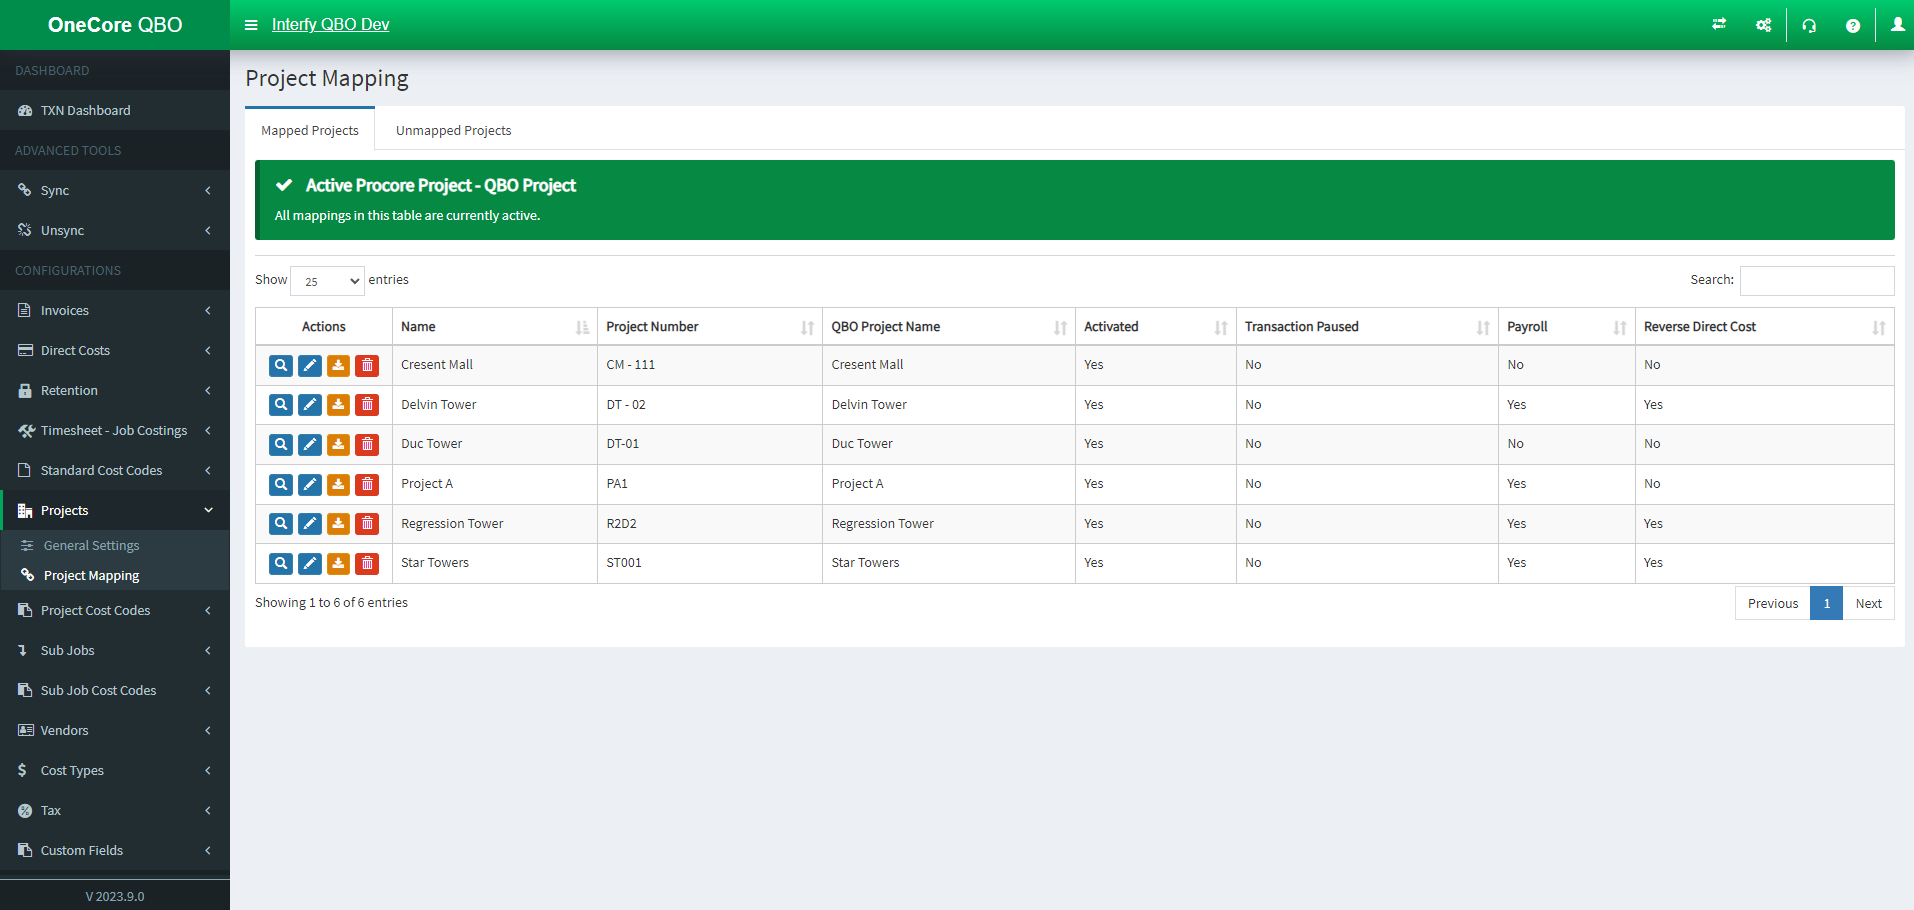
- Mapped projects: Active mappings
- Unmapped Projects: Set your project mapping here
Project Cost Codes:
Project Cost Codes has four options: Expense Mapping, Revenue Mapping, Default Expense Accounts, Default Expense Items, Default Revenue Items.
Expense Mapping
Expense Mapping allows you:
- Select a project to view it’s current cost code mappings
- Apply to All: Create mappings for all cost codes of the selected project
- Auto-map Procore cost codes to QuickBooks expense accounts on Selected Project
- Delete established mapping
- Manually map them from unmapped cost codes
Project Cost Code Mapping – Expense – Account (QuickBooks Account)
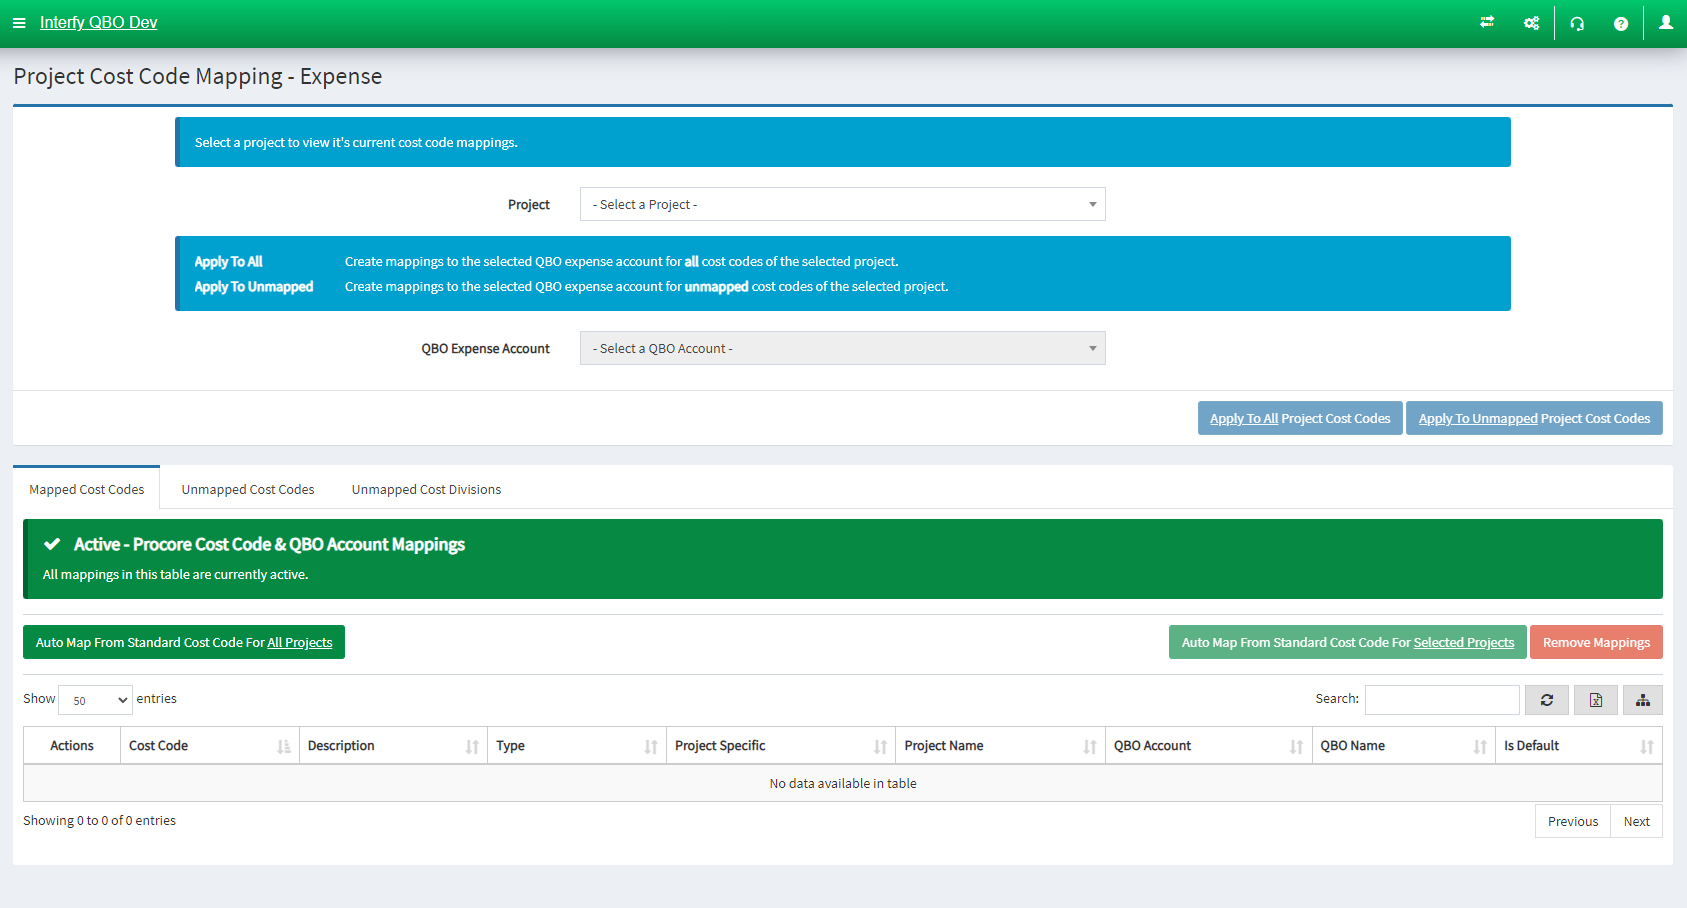
- Select a project to view it’s current cost code mappings
- Apply to All: Create mappings to the selected QBO Expense Account for all cost codes of the selected project
- Apply to Unmapped: Create mappings for all unmapped project cost code
- Mapped Standard Cost Codes: Active mappings
- Unmapped Cost Codes: Set your cost code mapping here
- Unmapped Cost Divisions: Set your cost division mapping here
Project Cost Code Mapping – Expense – Item (QuickBooks Item)
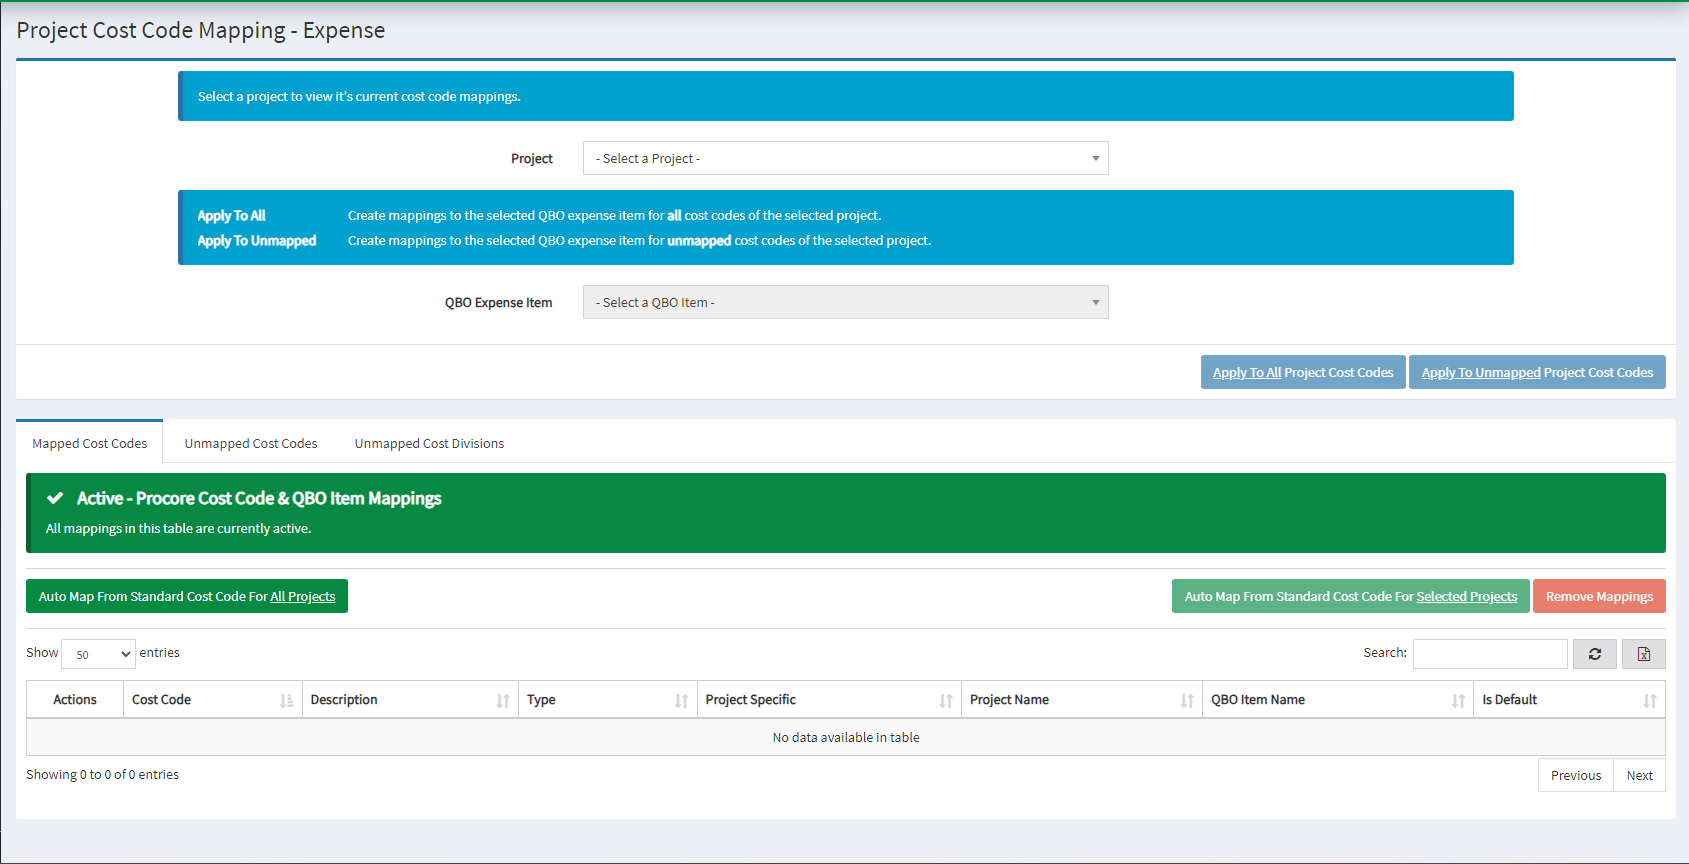
- Select a project to view it’s current cost code mappings
- Apply to All: Create mappings to the selected QBO Expense Item for all cost codes of the selected project
- Apply to Unmapped: Create mappings for all unmapped project cost code
- Mapped Standard Cost Codes: Active mappings
- Unmapped Cost Codes: Set your cost code mapping here
- Unmapped Cost Divisions: Set your cost division mapping here
Revenue Mapping (HCC)
Revenue Mapping allows you:
- Select a project to view it’s current cost code mappings
- Apply to All: Create mappings for all cost codes of the selected project
- Apply to Unmapped: Create mappings for all unmapped project cost code
- Auto-map Procore cost codes to QuickBooks Revenue Item on Selected Project
- Delete established mapping
- Manually map them from unmapped cost codes
Project Cost Code Mapping – Revenue Mapping
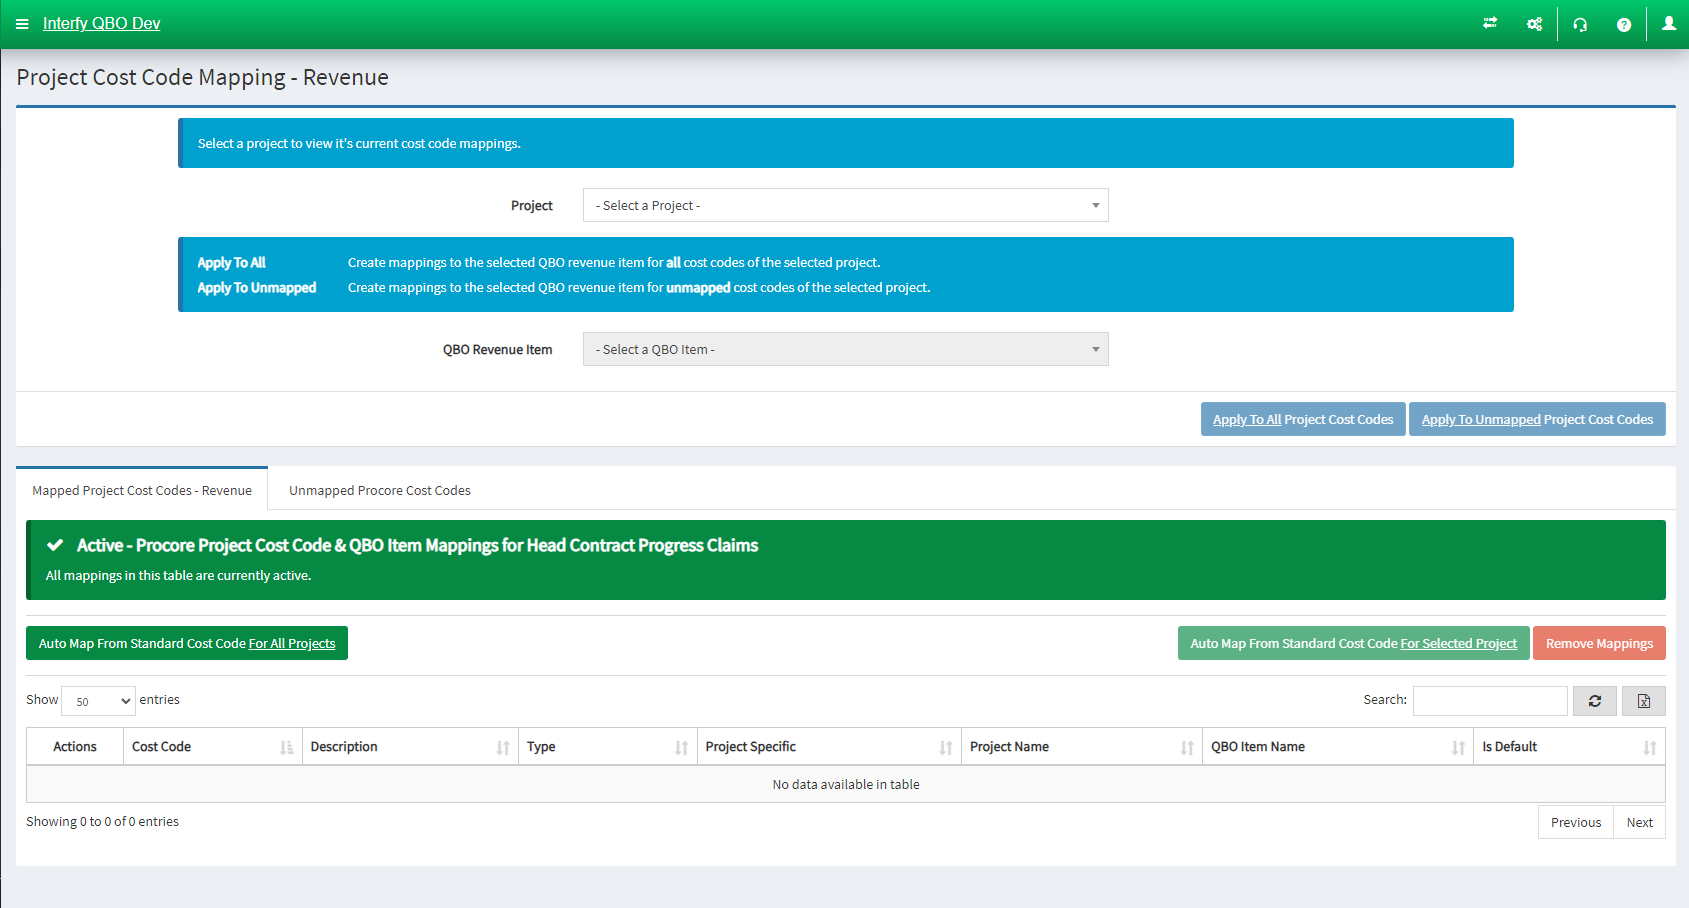
- Select a project to view it’s current cost code mappings
- Apply to All: Create mappings to the selected QBO Revenue Item for all cost codes of the selected project
- Apply to Unmapped: Create mappings for all unmapped project cost code
- Mapped Procore Cost Codes – Revenue: Active mappings
- Unmapped Procore Cost Codes: Set your cost code mapping here
Default Expense Accounts
Default Expense Accounts allows you to:
- Set a default QBO Expense Account for each project, which takes precedence over the default account defined for standard cost codes.
Procore Cost Codes – Default Expense Accounts
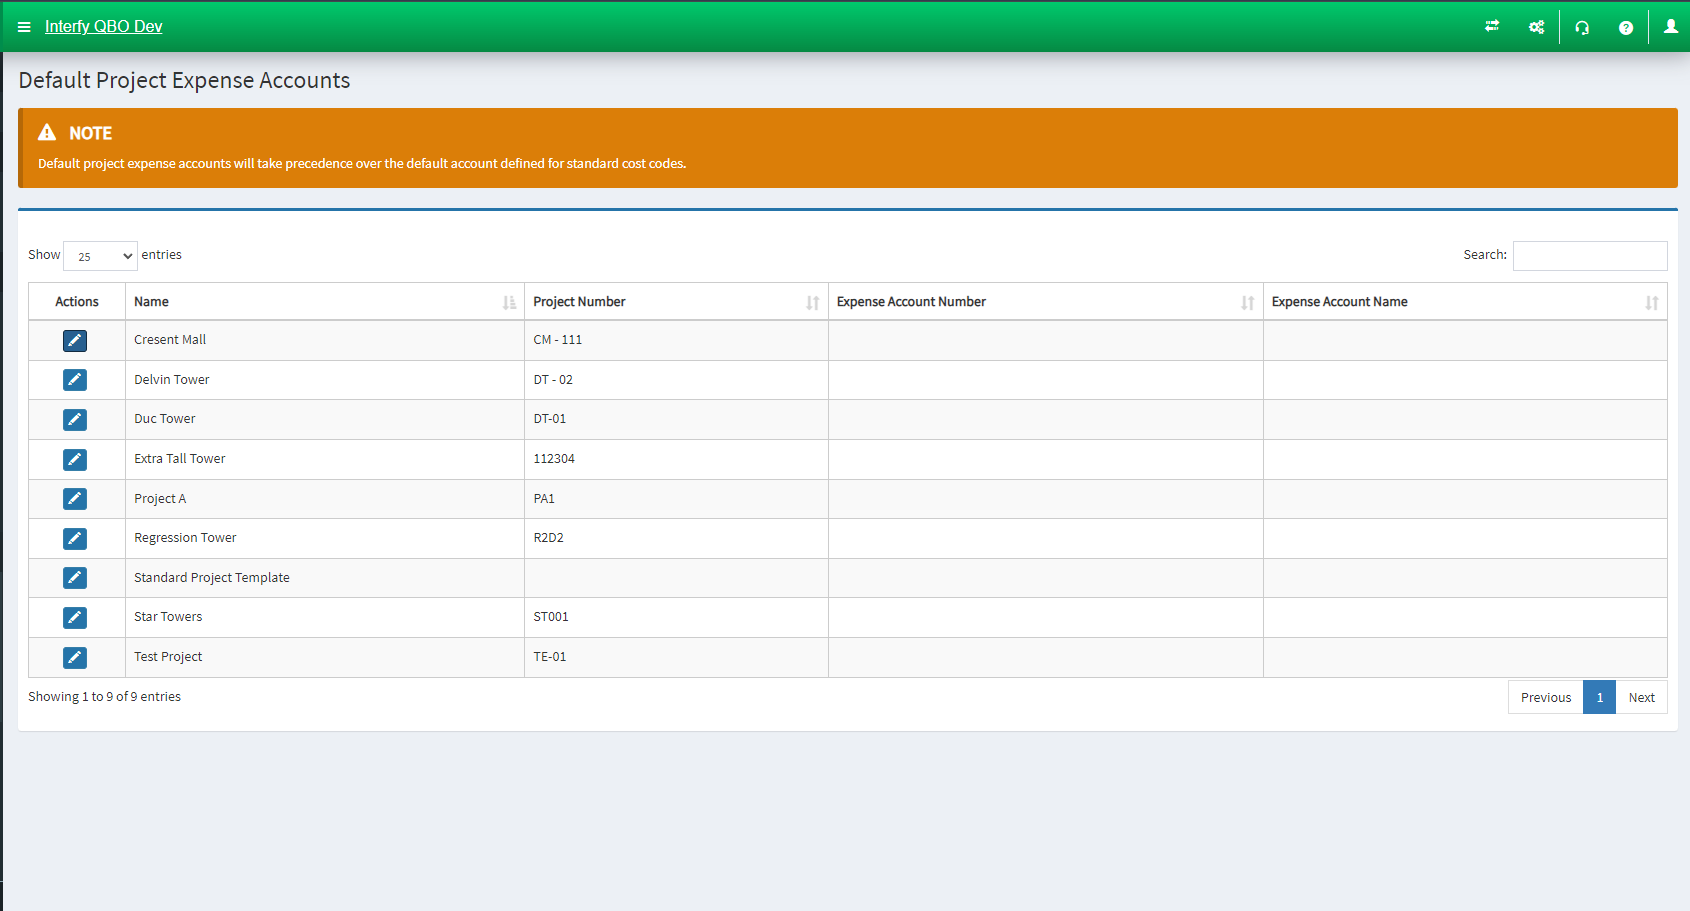
- Pencil Icon: Click the particular icon to establish the account’s mapping under a project
Default Expense Items
Default Expense Accounts allows you to:
- Set a default QBO Expense Item for each project, which takes precedence over the default account defined for standard cost codes.
Procore Cost Codes – Default Expense Items
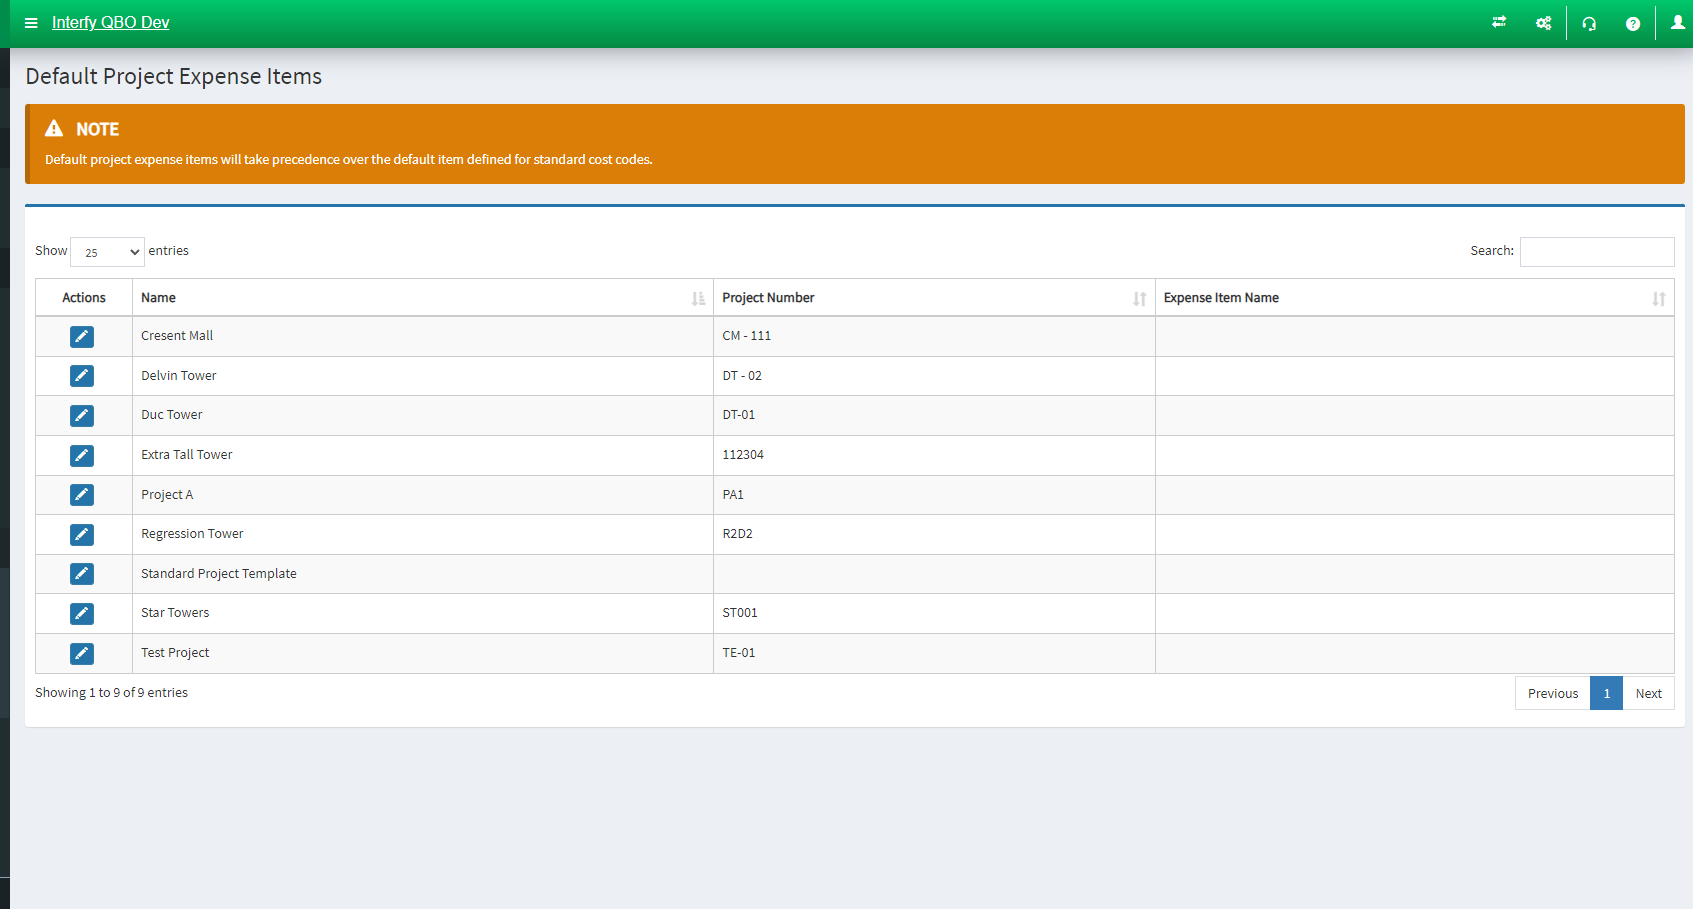
- Pencil Icon: Click the particular icon to establish the account’s mapping under a project
Default Revenue Items
Default Revenue Items allows you to:
- Set a default QBO Revenue Item for each project, which takes precedence over the default account defined for standard cost codes.
Procore Cost Codes – Default Revenue Items
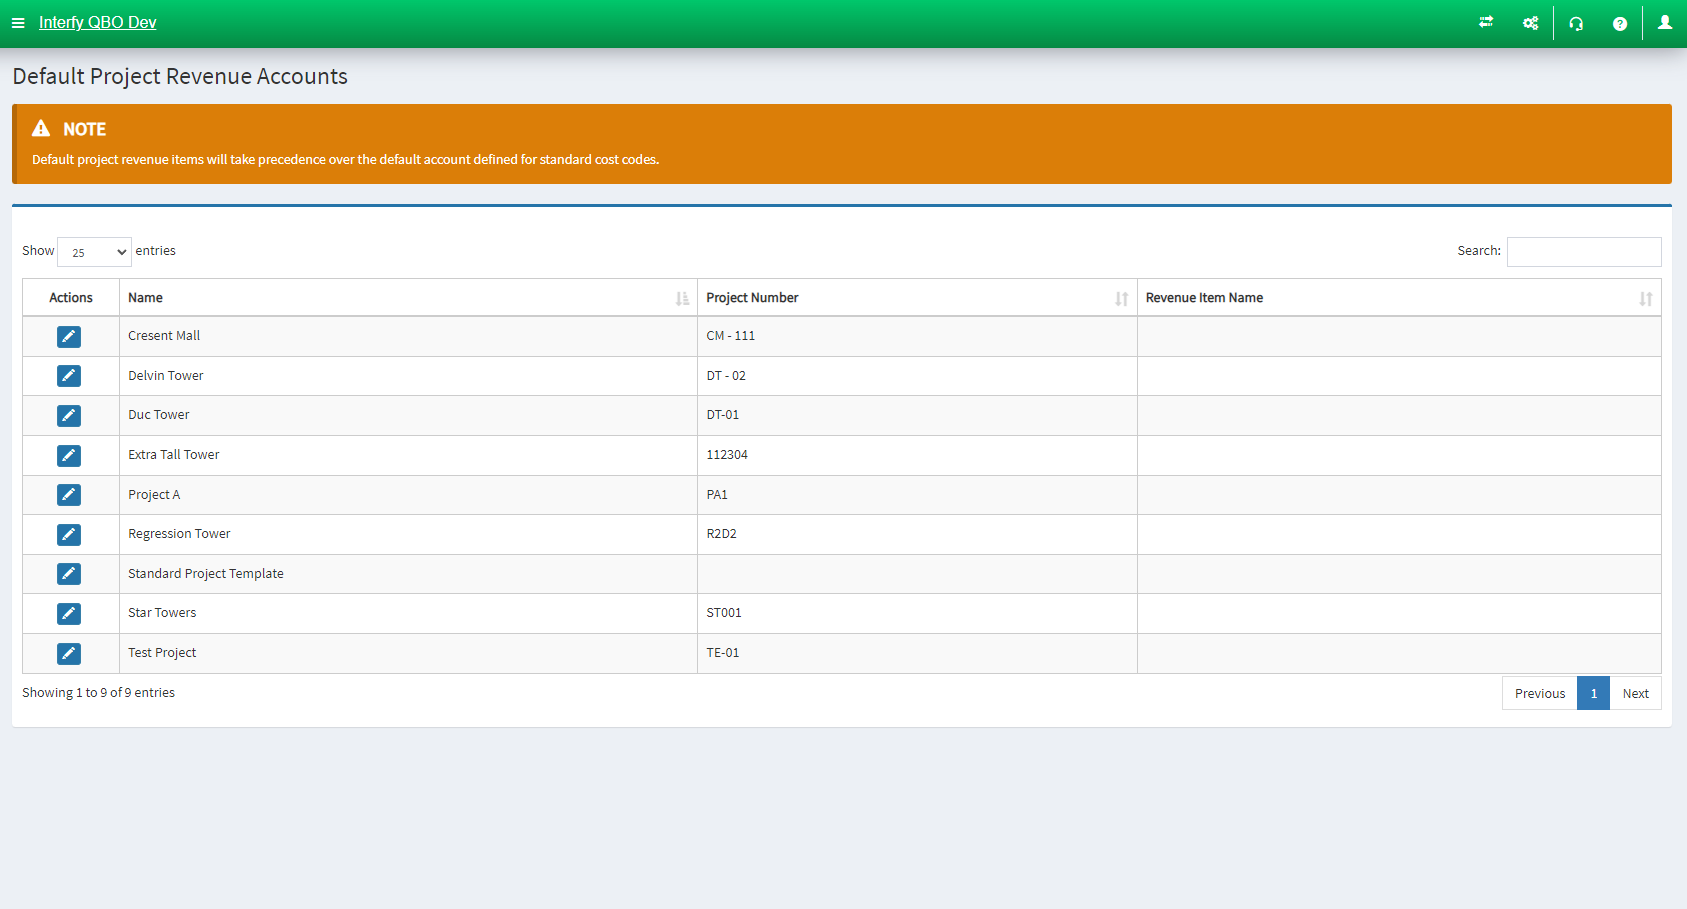
- Pencil Icon: Click the particular icon to establish the item’s mapping under a project
Sub Jobs:
Projects has four options: General Settings, Sub Job Mapping
General Settings
General Settings allows you to:
- Update the Procore Project Sub Job and Sub Job Cost Codes lists in OneCore
Sub Job Settings:

- Refresh Procore Sub Jobs (Procore)
- Refresh Procore Sub Job Cost Codes (Procore)
Sub Job Mapping
Sub Job Mapping allows you to:
- Establish Procore Sub-Job mapping
Sub Job Mapping:
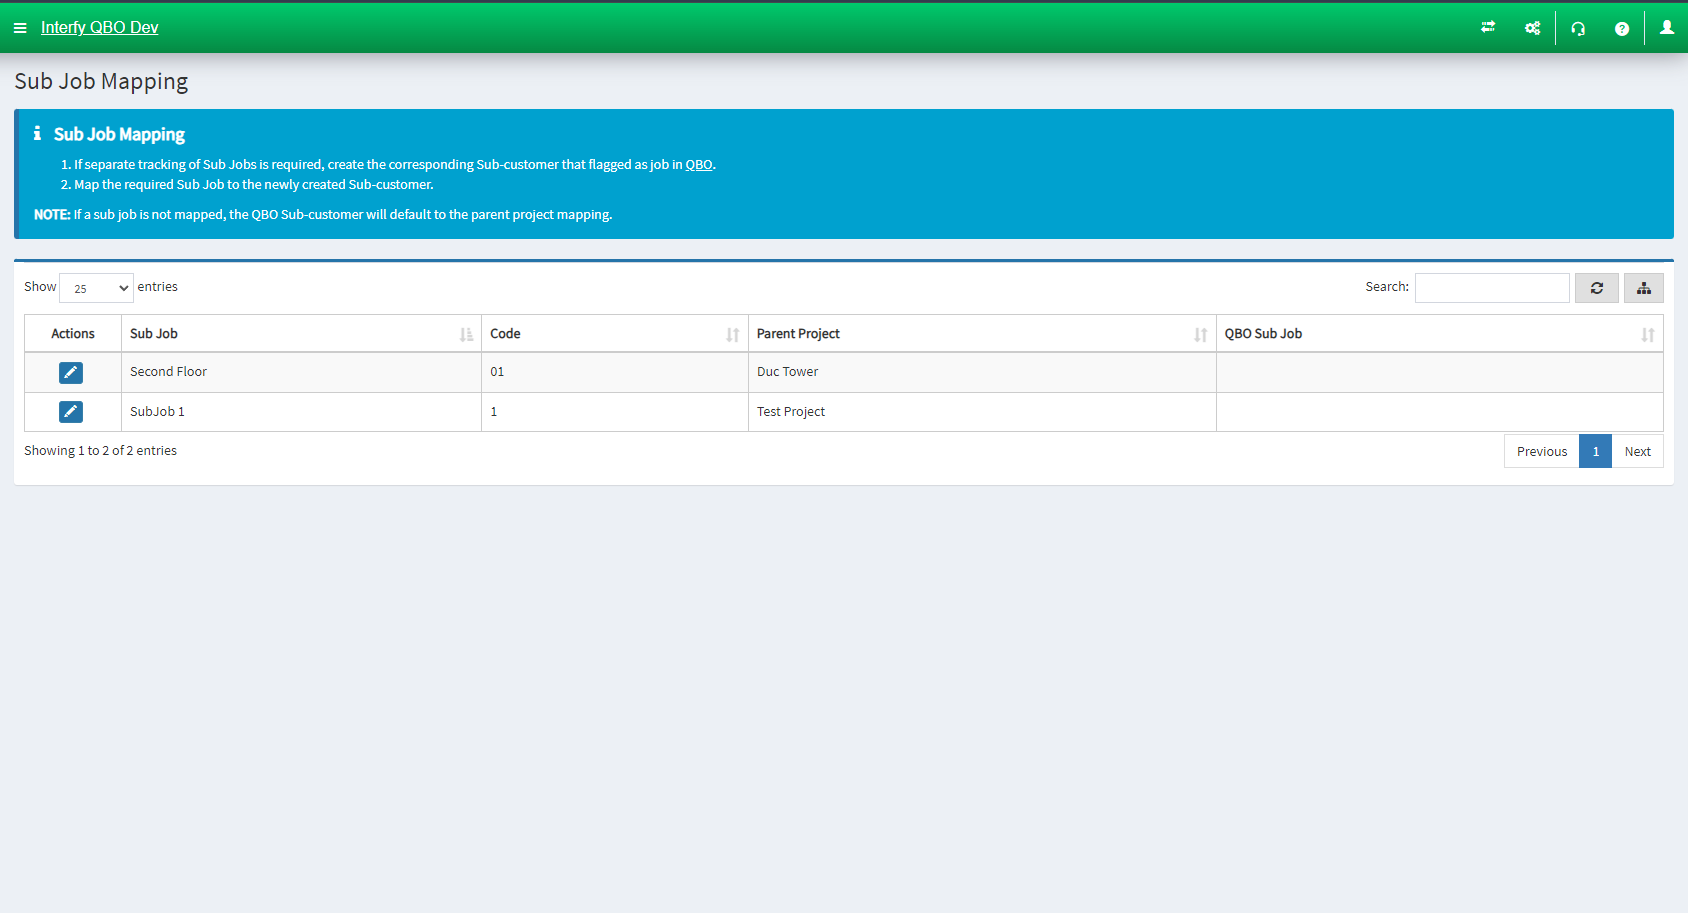
- Pencil Icon: Click the particular icon to establish the account’s mapping under a project
Sub Jobs Cost Codes:
Sub Job Cost Codes has four options: Expense Mapping, Revenue Mapping
Expense Mapping
Expense Mapping allows you to:
- Auto-map Procore cost codes to QuickBooks expense accounts (Account/ Item)
- Delete established mapping
- Manually map them from unmapped cost codes.
Sub Job Cost Codes – Expense Mapping – Account

- Apply to All feature: Apply QuickBooks Expense Account to all Sub Job Cost Codes
- Apply to Unmapped: Apply QuickBooks Expense Account to all unmapped Sub Job Cost Codes
- Mapped Cost Codes: Active mappings
- Unmapped Cost Codes: Set your cost code mapping here
- Unmapped Cost Division: Set your cost code division here
Sub Job Cost Codes – Expense Mapping – Item
- Apply to All feature: Apply QuickBooks Expense Item to all Sub Job Cost Codes
- Apply to Unmapped: Apply QuickBooks Expense Item to all unmapped Sub Job Cost Codes
- Mapped Cost Codes: Active mappings
- Unmapped Cost Codes: Set your cost code mapping here
- Unmapped Cost Division: Set your cost code division here
Revenue Mapping
Revenue Mapping allows you to:
- Auto-map Procore cost codes to QuickBooks revenue item
- Delete established mapping
- Manually map them from unmapped cost codes.
Sub Job Cost Codes – Revenue Mapping – Item
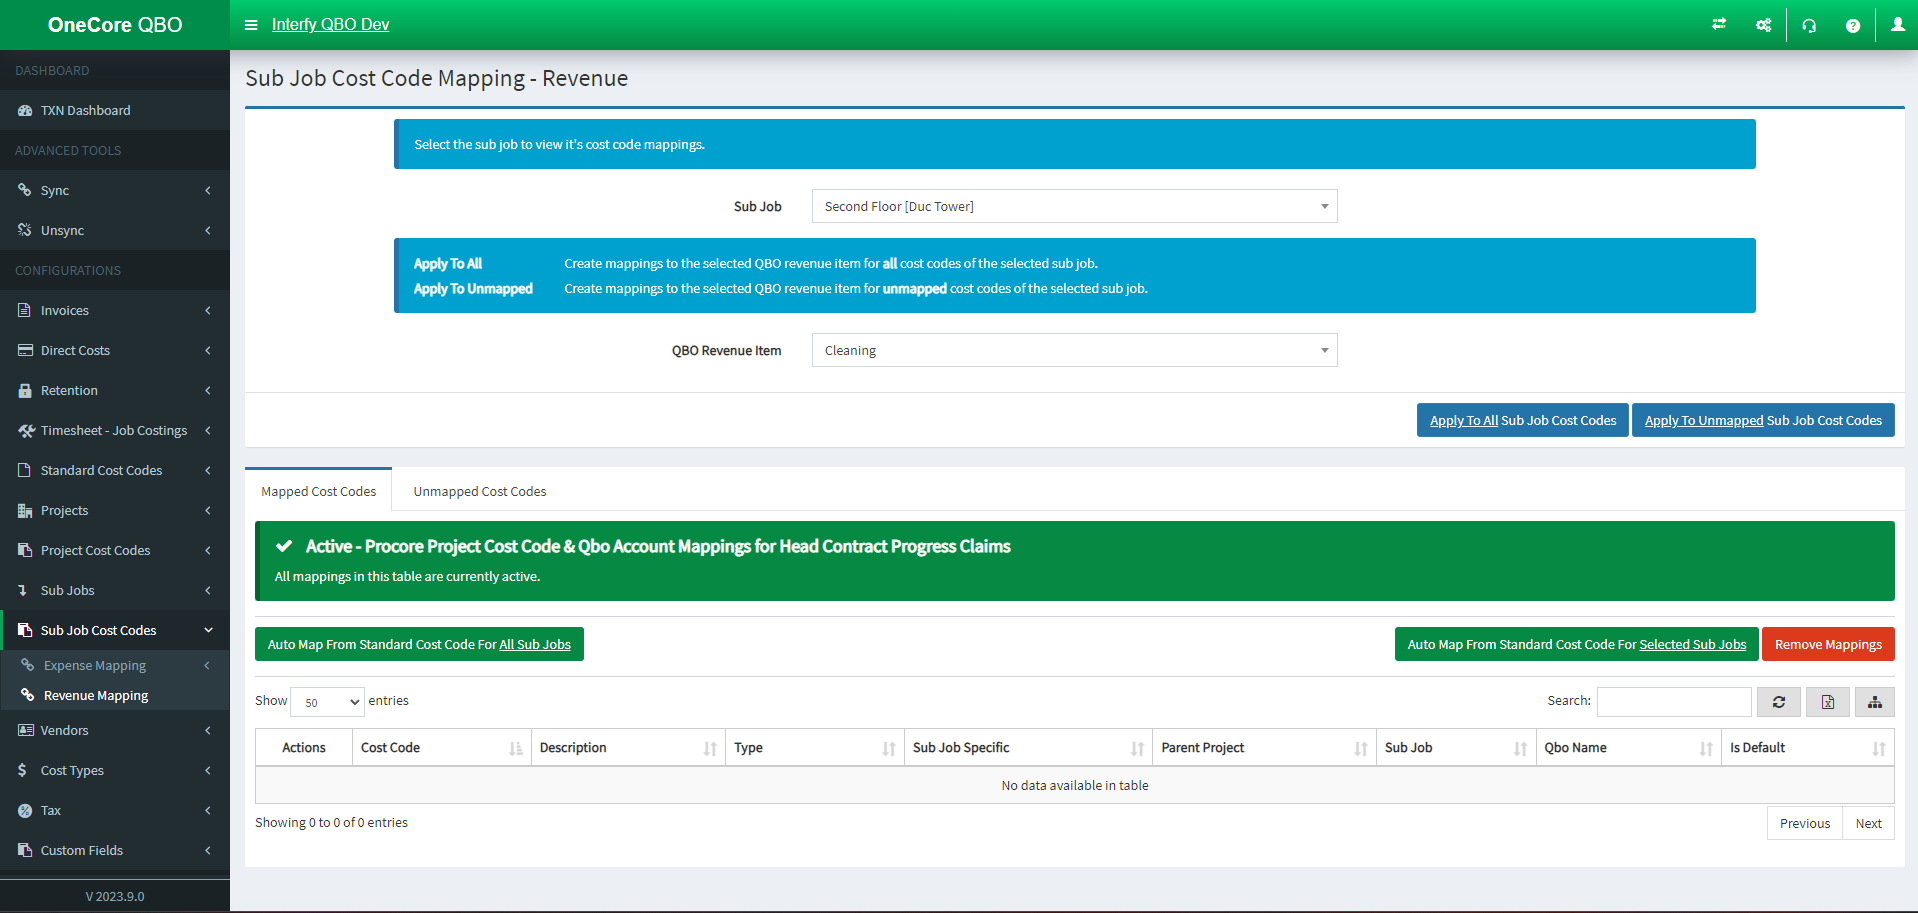
- Apply to All feature: Apply QuickBooks Expense Item to all Sub Job Cost Codes
- Apply to Unmapped: Apply QuickBooks Expense Item to all unmapped Sub Job Cost Codes
- Mapped Cost Codes: Active mappings
- Unmapped Cost Codes: Set your cost code mapping here
Feature Part 2 (Link)
In Part 2, we will cover:
- Vendor
- Cost Types
- Tax
- Custom Fields
Link to part 2