
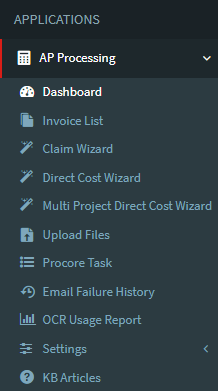
AP Processing | OneCore
Activation
Email hello@interfy.com.au to request the OneCore AP Processing module to be included in your subscription.
Once activated, the “AP Processing” menu item will appear in your OneCore navigation menu.
Setup
Refresh Procore Data
Navigate to “Settings -> General Settings” and press “Refresh all data from Procore”. This allows a OneCore to retrieve the initial information.

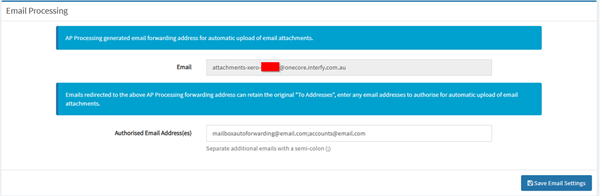
Email Processing
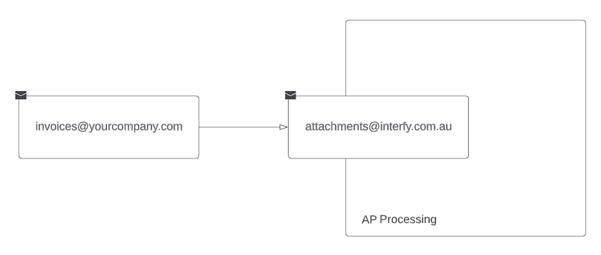
AP Processing Mailbox: AP Processing generated email forwarding address for automatic upload of email attachments.
Authorised Email Address(es): Emails redirected to the above AP Processing forwarding address can retain the original “To Addresses”, enter any email addresses to authorise for automatic upload of email attachments.
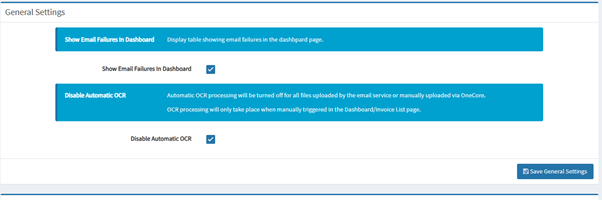
General Settings
- Show Email Failures in Dashboard: Display table showing email failures in the dashboard page.
- Disable Automatic OCR (Only for OCR activated customers)
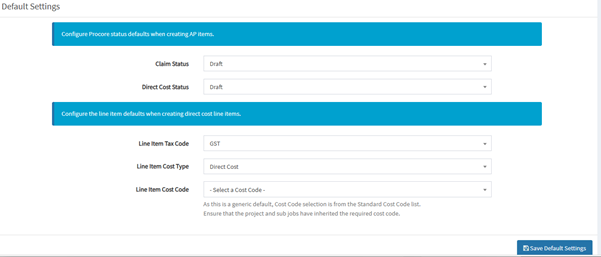
Default Settings
- Configure Procore status defaults when creating AP items.
- Configure the line item defaults when creating direct cost line items.
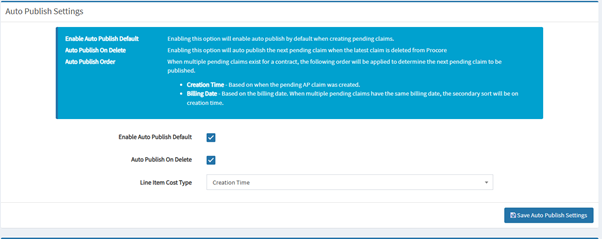
Auto Publish Settings
- Enable Auto Publish Default – Enabling this option will enable auto publish by default when creating pending claims.
- Auto Publish On Delete – Enabling this option will auto publish the next pending claim when the latest claim is deleted from Procore
- Auto Publish Order (NEW) – When multiple pending claims exist for a contract, the following order will be applied to determine the next pending claim to be published.
Creation Time – Based on when the pending AP claim was created.
Billing Date – Based on the billing date. When multiple pending claims have the same billing date, the secondary sort will be on creation time.
File Types
Users can select from a list of file types for processing. Only selected file types will be processed by the system, and any unselected file types will be ignored.

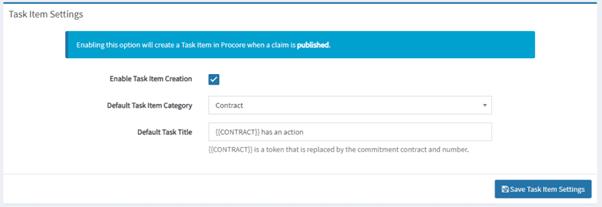
Task Item Settings
To enable Task item creation within Procore, ensure the ‘Enable Task Item Creation’ is checked. Enabling this will allow AP Processing to create a Procore ‘Task’ when a draft Commitment Claim is published from APP.
A default Task Title can be set within this area.
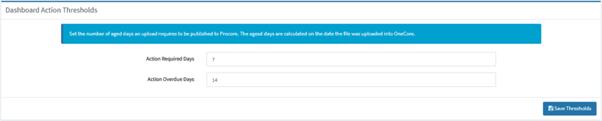
Dashboard Action Thresholds
These settings allow uploaded invoices to be categorised into groups visible in the dashboard.
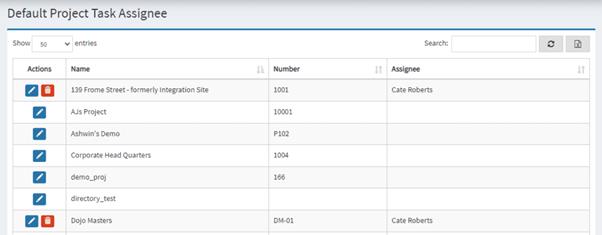
Project Assignees (Optional)
Navigate to “Settings -> Project Assignees” to enter assignees for each project.
Assignees are Procore users who have access to a project’s “Task List”. An assignee can receive Procore Task items when a new Commitment Claim is published from APP.
Invoice Uploads
Mailbox Diversion
As part of the AP Processing solution, we offer an Interfy mailbox that can be used to forward invoices from your company’s existing invoice mailbox. To setup retrieve your mailbox diversion email address please contact support@interfy.com.au.
Upload Page
Alternatively, invoices can be uploaded directly into APP through the “Upload” menu item. The upload page allows a maximum of 5 uploads at a time with the file extensions of:
PDF, DOC, DOCX, XLS, XLSX, JPG, JPEG, PNG, GIF, TIF, TIFF, BMP and .MSG
Dashboard
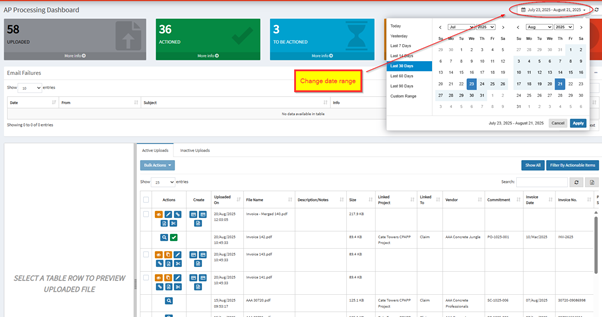
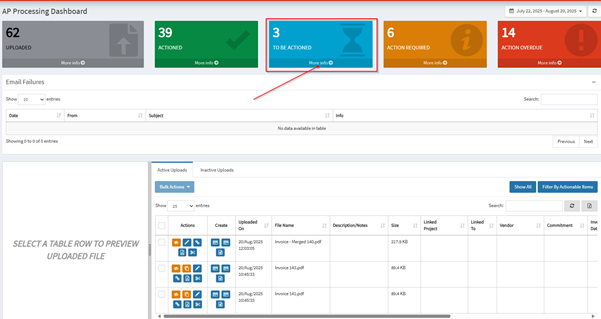
Top Banner – The APP Dashboard, by default, will show items from the last 30 days. This can be customised to display a specific date range. The coloured banners indicate invoices that fall into thresholds configured in the settings above.
- Left Panel – A preview of the selected row’s invoice.
- Right Panel – A table displaying all invoices in the selected date range.
- Active Uploads – Processed or under processing attachments
- Inactive Uploads – Cancelled attachments
Potential Attachment Duplicate Feature
The potential duplicate is designed to detect and helping users to manage duplicate attachments in APP. If we identified there’s some attachment is a potential of duplicate, we will flag them with a icon in dashboard.
Here are the ways how APP flags potential duplicates:
(1) Table View
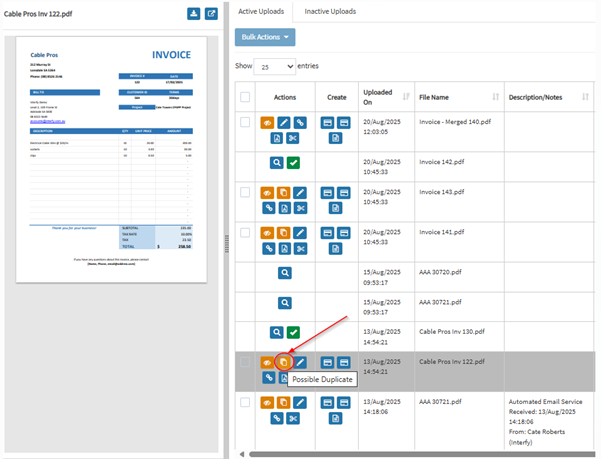
When there’s potential of duplicates, the ‘duplicate icon’ will show in the table as shown above.
(2) When creating a commitment claim/ direct cost

If a user attempts to create a direct cost or claim and there is a potential duplicate, a warning banner will be displayed, indicating the duplicate status.
Removing Duplicates from the APP Dashboard or Invoice List
To remove the duplicates from the APP, here’s how:
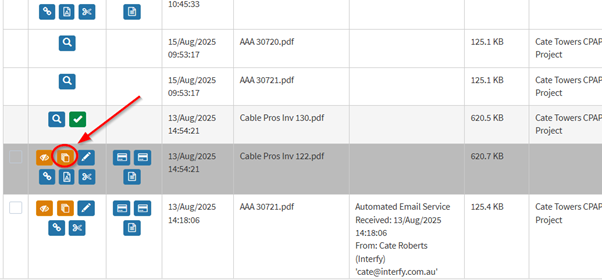
Locate the duplicate icon button in the table and click on it
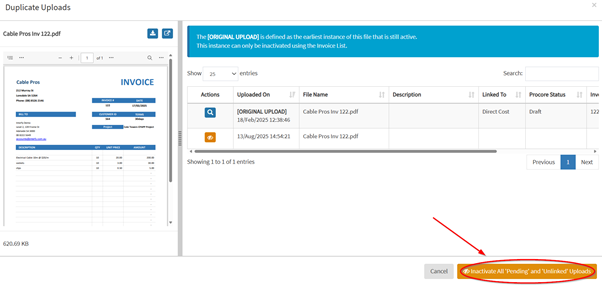
Click Inactivate All ‘Pending’ and ‘Unlinked’ Uploads to deactivate the attachments
By following these steps, users can efficiently manage and remove duplicate attachments, ensuring that only the relevant files are kept active in the system
Invoice List
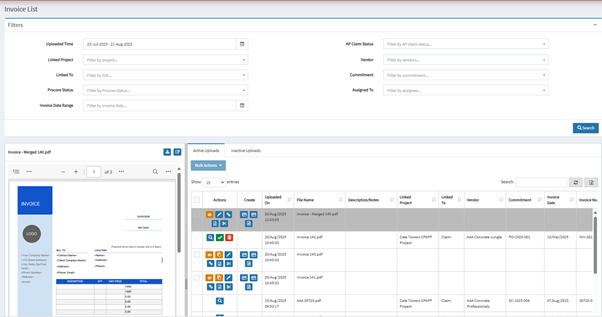
Top Banner – The invoice list, by default, will show items from the last 30 days. This can be customised to display a specific date range. There are a number of search filters that can be used to refine the results table.
Left Panel – A preview of the selected row’s invoice.
Right Panel – A table displaying all invoices in the selected date range and filter options.
Top Banner – Filters
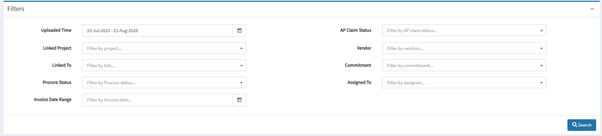
Uploaded Time
- Filter records based on the date range
Linked Project
- Filter records that are associated with specific projects
Linked To
- Filter records based on the entities they are linked to (e.g Unlinked, Claim and Direct Cost)
Procore Status
- Filter records based on their status in Procore
Invoice Date Range
- Filter records based on the invoice or bill date
AP Claim Status
- Filter records based on the status in AP Claim (e.g Auto Publish Failed, Pending and Published)
Vendor
- Filter records associated with specific vendors
Commitment
- Filter records based on Commitment in Procore
Assigned To
- Filter records based on the person they are assigned to
Deleting a Claim or Direct Cost with Pending AP Status
This feature allows users to delete claims or direct costs with a pending AP status by clicking the red trash button to ensure invoice list remains accurate and up-to-date
Commitment Claim
Direct Cost
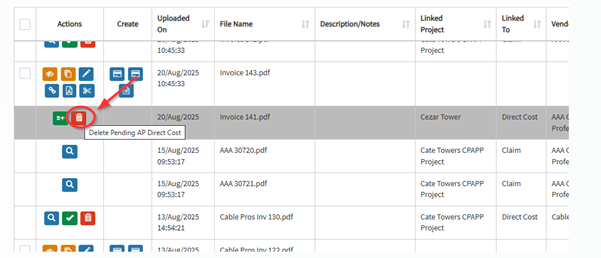
Only claims with ‘Pending ‘AP Status can be deleted.
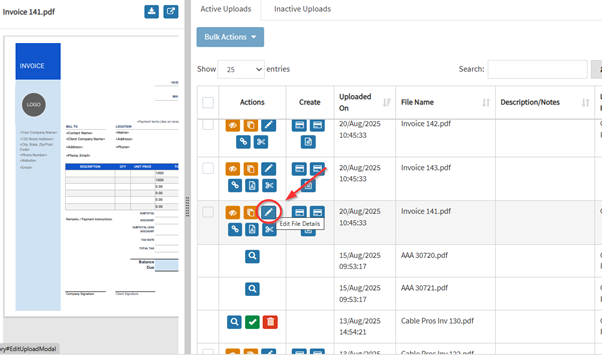
Ability To Prefill Values To an Invoice
The prefill values feature is designed to simplify and expedite the invoicing process by automatically populating specific fields in APP with predefined values when assigning to someone within the company.
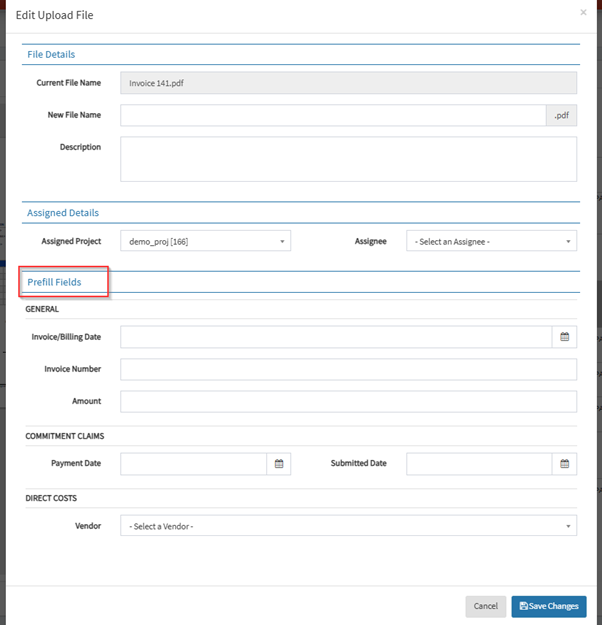
Prefill Fields
General
Invoice/Billing Date
- The date on which the invoice was issued
- It will be pushed to Procore
Invoice Number
- The unique identifier for the invoice associated
- It will be used when pushing to Procore
Amount
- The total amount specified, will be stored within the APP system for internal reference
Commitment Claims
Payment Date
- The date on which the payment was made for Commitment Claim
- It will be pushed to Procore
Submitted Date
- The date on which the invoice was submitted
- It will be pushed to Procore
Direct Costs
Vendor
- The name of the vendor who issued the invoice
- It will be pushed to Procore
Claim Wizard
Navigate to “Claim Wizard” to create a new claim through the guided claim wizard. This will allow a commitment claim to be:
- Created in a “Published” state – where a draft commitment claim is created in Procore against the selected commitment.
- Created in a “Pending” state – where the details of the claim are stored in APP, ready for publishing to Procore.
Layout
Left Panel – A preview of the uploaded invoice appears in the left panel with controls to enable the user to navigate through all uploaded invoices and to ignore any unwanted uploaded invoices.
Right Panel – Wizard to create an APP Commitment Claim in a pending or published state.
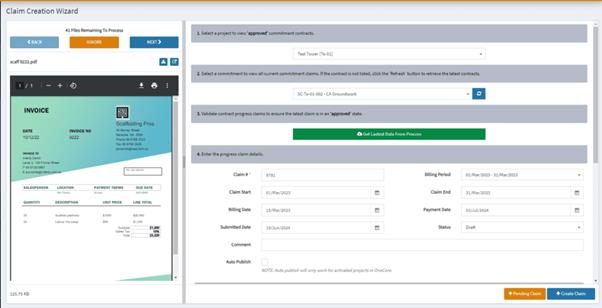
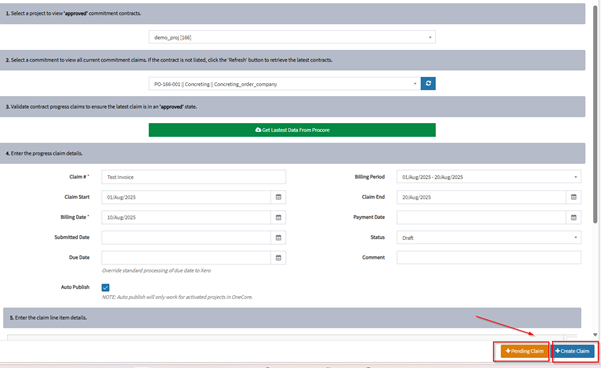
Step 1 – Select Project

Select the Procore Project to create a commitment claim for.
Step 2 – Select Commitment

Select the commitment contract (purchase order or subcontract) to create the commitment claim for. If the commitment does not appear in the list, press the blue ‘refresh’ icon.
Step 3 – Validate Contract Progress Claim

Press the ‘Get Latest Data From Procore’ button to retrieve all claims from Procore. This is required to ensure the latest claim is in ‘approved’ state.
If the latest progress claim in Procore is not in an ‘approved’ state, a warning banner will show.

Step 4 – Enter Progress Claim Details
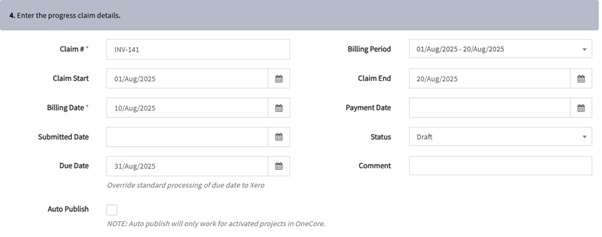
Auto Publish
- Enabling this checkbox will automatically push progress claims to Procore when the last claim is finally in an approved state
Step 5 – Enter the Claim Line Item(s) Details
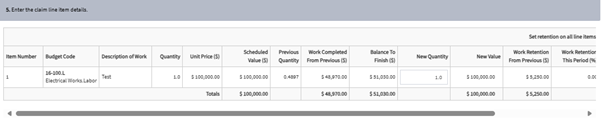
- Enter the amount to be claimed in the text box accordingly
- User can now set retention on all line items
Step 6 – Create a Procore Task Item (Optional)
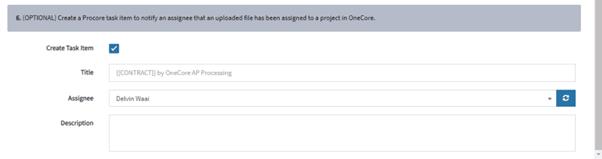
- A notification within Procore can be created for a user in Procore’s ‘Task Tool’ for the selected Assignee.
- A title and description can be entered.
Once everything is filled, user can create a ‘pending’ claim or create an official claim using the button at the bottom.
Direct Cost Wizard
Navigate to “Direct Cost Wizard” to create a new direct cost through the guided wizard.
Layout
Left Panel – A preview of the uploaded invoice appears in the left panel with controls to enable the user to navigate through all uploaded invoices and to ignore any unwanted uploaded invoices.
Right Panel – Wizard to create an direct cost
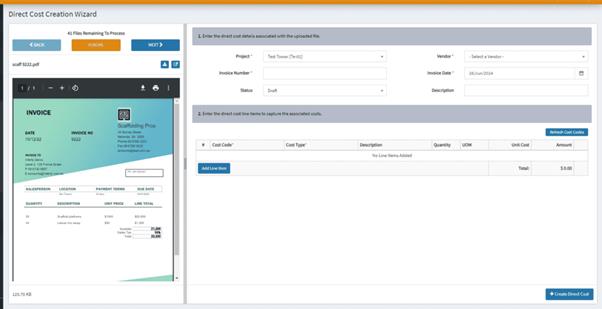
Create Direct Cost
Set direct cost type – Invoice or Expense
Note: Expense type does not integrate to your accounting app while Invoice type does.
To a direct cost based on a attachment, just fill in the details into the fields, hit Create Direct Cost
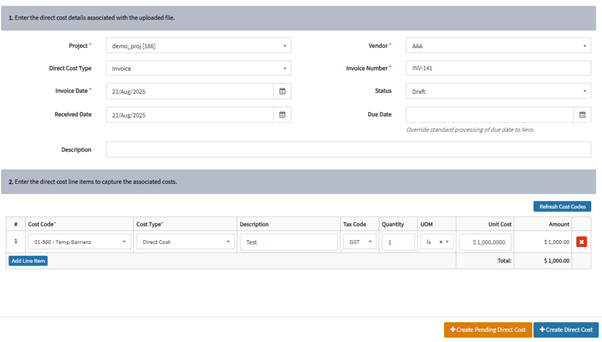
Direct Cost Due Date Field (For Xero Users only) – Allow setting “Due Date” which will override the payments terms set in OneCore when pushing through invoices into Accounting App.
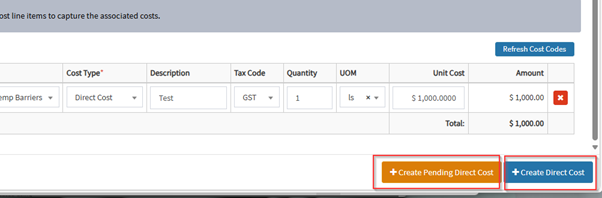
Create pending direct costs – will not publish to Procore yet and will be marked as pending in your APP dashboard.
Create Direct Cost – will publish direct cost in Procore.
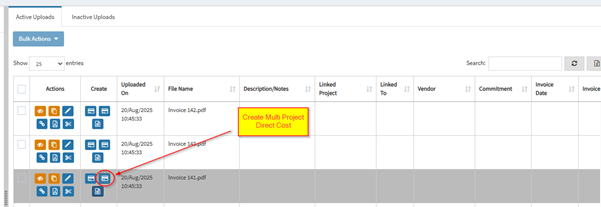
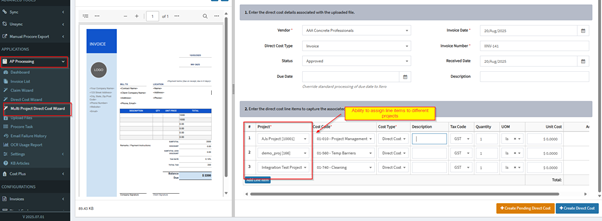
Multi Project Direct Cost (NEW)
Navigate to AP Processing Dashboard or Invoice List. An additional action button is available to create a direct cost and assign to multiple projects.
Or From the Multi Project Direct Cost Wizard: Navigate to AP Processing > Project Direct Cost Wizard
Split PDF File (NEW)
Navigate to AP Processing Dashboard or Invoice List. An additional action button is available to split invoices.
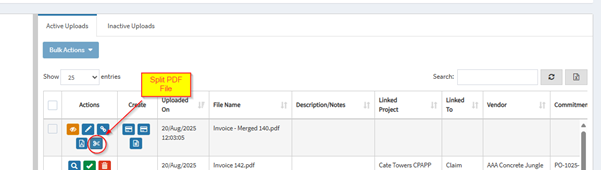
Drag 1 or more pages to the right panel to split invoice.

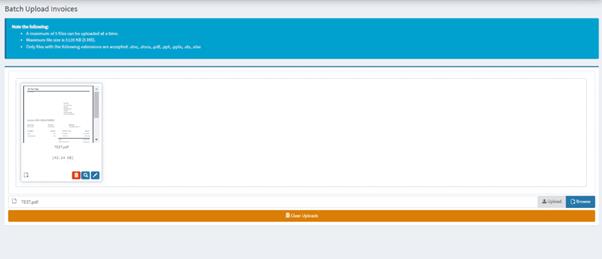
Upload Files
Batch Upload Invoices
User can drag and drop files into the box, hit upload button once completed
Procore Task
APP offers a feature which allow user to create a task item in the portal and assigning it to an employee or staff member for processing
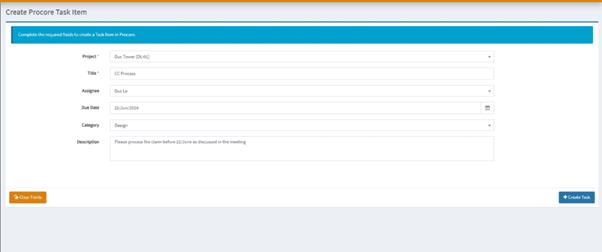
- Hit Create Task once the details are filled
Email Failure History
The email failure history log allows users to monitor and review any issues that occurred during the forwarding of attachments from the designated domain to the portal.
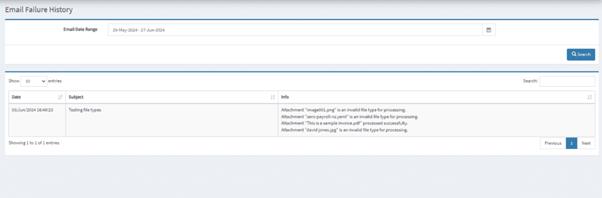
- Top Panel: User can filter the email based on date range in the select list provided
- Bottom Panel: The existing log data query from the date range specified in top panel
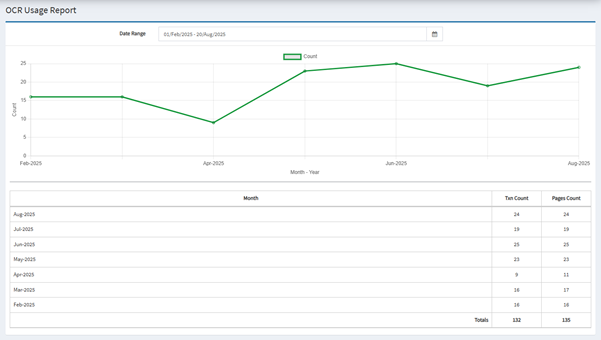
OCR usage report for customers (New)
Navigate to AP Processing> OCR Usage Report
Dashboard now has “To BE Actioned” button filter (NEW)