
Activation
Email hello@interfy.com.au to request the OneCore Cost Plus module to be included in your subscription.
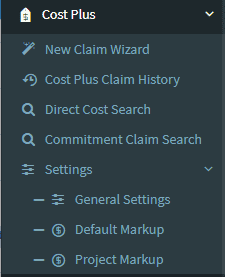
Once activated, the “Cost Plus” menu item will appear in your OneCore navigation menu.
Setup
Refresh Procore Data
Navigate to “General Settings” and press “Refresh all data from Procore”. This allows a OneCore to retrieve the initial information ready to create your first Cost Plus claim.
Default Markup
Navigate to “Default Markup” to enter the global markup default and custom markups for Cost Types.


Project Markup
Navigate to “Project Markup” to enter optional markups per project.
If a project does not have custom markup rates entered, the default markup rates (above) are used.
Best Practice Recommendation
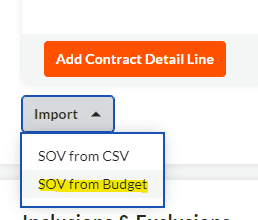
We recommend importing the project budget into the Head Contract’s SOV. This will ensure that budget codes (cost code / cost type combinations) will be able to be matched to a Head Contract SOV budget code.
When creating a new Head Contract, select the “Import” button and select the “SOV from Budget” option.
Create a new Claim (Payment Application)
Navigate to “New Claim Wizard” to create a new claim through the guided claim wizard.
Step 1 – Contract Selection

- Select the “Project” the claim is to be created for.
- Select the “Contract” the claim is to be created for. If the contract does not appear in the list, press the refresh icon beside the dropdown.
- Press “Retrieve Progress Claims for Review”.
- Existing claims related to the contract will be retrieved from Procore and displayed.
- Press “Next”.
NOTE: A new claim can only be created if the latest claim is in the “Approved” state.

If the latest claim is not in the approved state, the above message will appear and a new Cost Plus claim cannot be created.
Step 2 – Claim Details


- Enter the Progress Claim #.
- The period start and end dates will be prepopulated – adjust these to suit.
- Enter the “Billing Date”.
- Press “Next”.
Step 3 – Select Direct Costs


- A list of direct costs previously cached by OneCore will automatically be displayed for the Start and End dates displayed.
- If a direct cost can’t be found in the table, ensure the date fields are within the desired range and press “Refresh from Procore”.
- Finding a direct cost is made easier by utilising the “Vendor” and “Cost Type” filters if there are a large number of direct costs for the period.
- Press the “Apply Filter” button to display Direct Costs based on the search parameters.
- Once all desired direct costs are selected to be included in the claim, press “Next”.
Step 4 – Select Commitment Claims


- A list of commitment claims previously cached by OneCore will automatically be displayed for the Start and End dates displayed.
- If a commitment claim can’t be found in the table, ensure the date fields are within the desired range and press “Refresh from Procore”.
- Finding a commitment claim is made easier by utilising the “Vendor” and “Cost Type” filters if there are a large number of commitment claims for the period.
- Once all desired commitment claims are selected to be included in the claim, press “Next”.
Step 5 – High Level Review


- All of the selected Direct Costs and Commitment claims will be displayed in this stage of the wizard.
- To view a Direct Cost or Commitment claim within Procore, click the link provided on each line item.
- Each Direct Cost and Commitment will have a “View” icon that is a link to the Procore cost.
- Press the “Prev” button if a cost has been missed or a cost needs to be excluded.
- Press the “Next” button to generate the Claim within Procore.
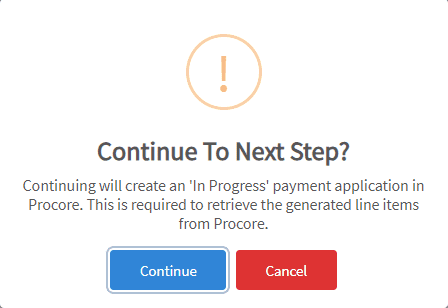
6. Once the “Next” button is pressed, a confirmation popup will appear. Once “Continue” is pressed, a Head Contract Claim will be created in Procore with the description “[CP IN PROGRESS]”
Step 6 – Additional Line Items


- This step of the wizard allows any additional lump sum amounts to be included within the Head Contract Claim.
- Press the “Next” button.
Step 7 – Detailed Review


- The Detailed Review step displays a summary of all expenses included in the Cost Plus claim with a column depicting the final marked up amount.
- At this point, if amendments need to be made, clicking on either the “Prev” button or clicking on the step will allow the user to adjust the Cost Plus claim.
- Press “Next” once a review is complete.

4. Once the “Next” button is pressed, a confirmation popup will appear. Once “Yes, publish it!” is pressed, the Head Contract Claim previously created in in Step 5 will be updated with “Work Completed” values entered and the prefix “[CP IN PROGRESS]” removed.
Step 8 – Completed


The final stage of the wizard shows a summary of the claim with the following details:
- A link to the claim in Procore.
- A summary of the claim details.
- A detailed breakdown of included line items showing original and markup amounts.
Deleting and Unlinking a Claim
If a claim needs to be deleted, firstly, the claim needs to be unlinked, then deleted from Procore.
- Navigate to “Cost Plus Claim History”
- Select the Project
- Press “Fetch Claim History”
- A summary of all Cost Plus claims will be displayed.
- Press the red “Unlink” icon

Once the red “unlink” icon is selected, a popup is displayed to confirm the unlinking.
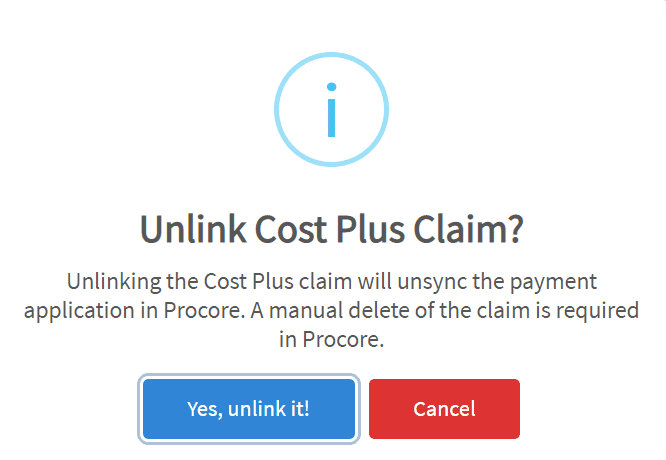
- This process only detaches linked Direct Costs and Commitment Claims so they are able to be selected for future use within the Cost Plus wizard.
- The draft claim in Procore needs to be removed.
Unmatched Line Items
The core of the Cost Plus Wizard’s process is to automatically link up budget codes from Direct Cost and Commitment Claim line items to a Head Contract’s SOV budget code. If a situation arises where budget codes cannot be found in a Head Contract SOV, the following prompt will appear:

There are a number of options to continue at this point.
Update the Head Contract SOV
Simply updating the Head Contract SOV with the missing budget code and restarting the wizard will ensure that this warning does not appear.
- Press the “Restart” button in the wizard.
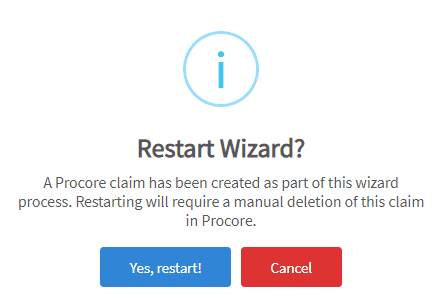
2. This will rename the [CP IN PROGRESS] prefix in the draft Head Contract claim to [CP REMOVED] to prompt the user that this claim needs to be deleted.
3. Update the Head Contract SOV with the missing budget code and restart the claim wizard.
Create a Variation (Change Order)
Creating a variation (change order) to include the unbudgeted cost then restarting the wizard will ensure that this warning does not appear.
- Press the “Restart” button in the wizard.
2. This will rename the [CP IN PROGRESS] prefix in the draft Head Contract claim to [CP REMOVED] to prompt the user that this claim needs to be deleted.
3. Create a variation (change order) to include the unbudgeted cost code / cost type and restart the claim wizard.
Continue with Unmatched Line Item
Another option is to simply continue with the Cost Plus claim and ensure that the unallocated amount is manually entered into the Head Contract Claim.
- Note down the amount discovered as “Unmatched Line Items”.
- Press the “Next” button to continue with the claim wizard until it is completed.
- Navigate to the Procore Head Contract claim and update the “Work Completed” value in an existing line item with the amount that was deemed “Unmatched”.
- This will ensure that amounts not missed with the Head Contract claim.
Tools
Direct Cost / Commitment Claim Search
This screen allows users to search for all direct costs and commitment claims within the selected project within the specified date range.

- Select the project to search.
- Specify a date range.
- Press the “Refresh from Procore” button to retrieve costs.
- Use the filter fields: Vendor, Type, Status and Invoiced to narrow down searches.
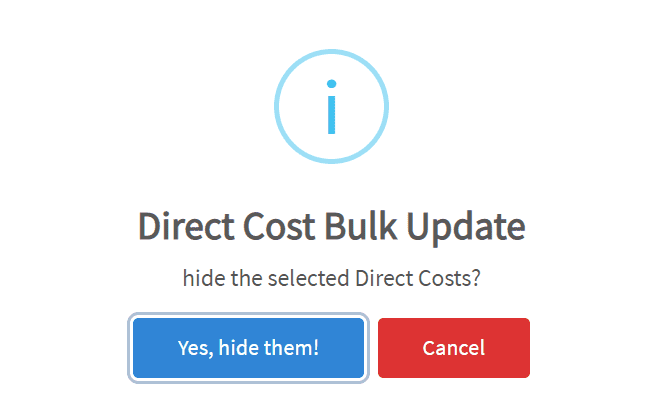
Hiding Costs
Costs that have already been billed for in a claim not created by the OneCore Cost Plus module can be hidden so that they do not appear in the “Claim Wizard”.

- Tick the costs that are to be hidden.
- Select “Bulk Actions” then “Hide Direct Costs / Commitment Claims”.
- Confirm the hide.
Once the costs have been hidden, they will appear in the “Hidden Direct Cost / Commitment Claims” tab.

The costs can be “unhidden” by ticking the desired rows and performing a “Show” bulk action.